Start
Instructions
Opening Mtg
Clearance
Audit Units
Findings
Closing Mtg
Feedback
Review
ℹ️
Audit inspections involve formal meeting stages and require client attendance and signatures at multiple points. Ensure the client representative is present before you begin. Click any screenshot to enlarge it.
Stage 1 — Start
Open the inspection from your queue. The Start screen shows a summary of the assignment — reference number, client, building, scheduled date and time, and the assigned inspector. Review these details carefully before proceeding.
1 Start screen — assignment summary
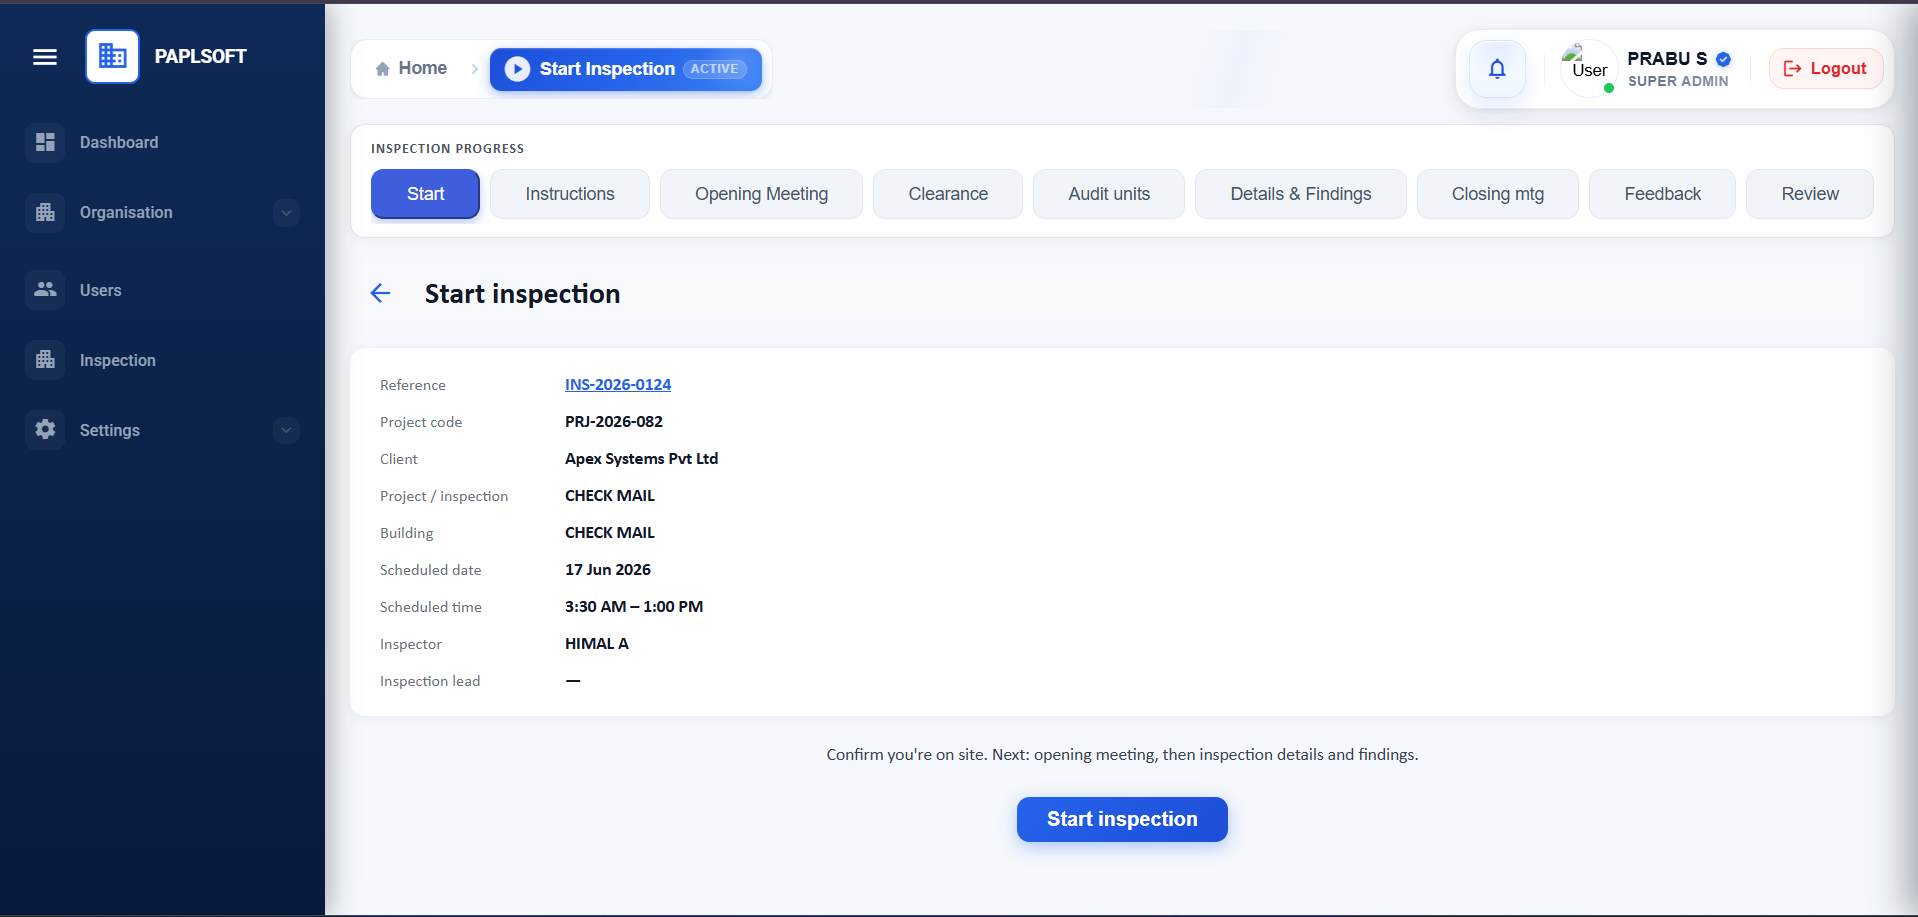
Confirm the reference, client name, building, and scheduled time match your assignment. The progress bar at the top shows all 9 stages of the traditional inspection.
Once you are on site and ready, click Start Inspection. The timestamp is recorded at this point.
⚠️
Do not click Start Inspection until you are physically on site. The start timestamp is captured at this moment and appears in the final report.
Stage 2 — Inspection Instructions
The Inspection Instructions screen displays the formal terms and conditions that must be read aloud to the client or site representative before the inspection begins.
2 Inspection Instructions — read aloud to client
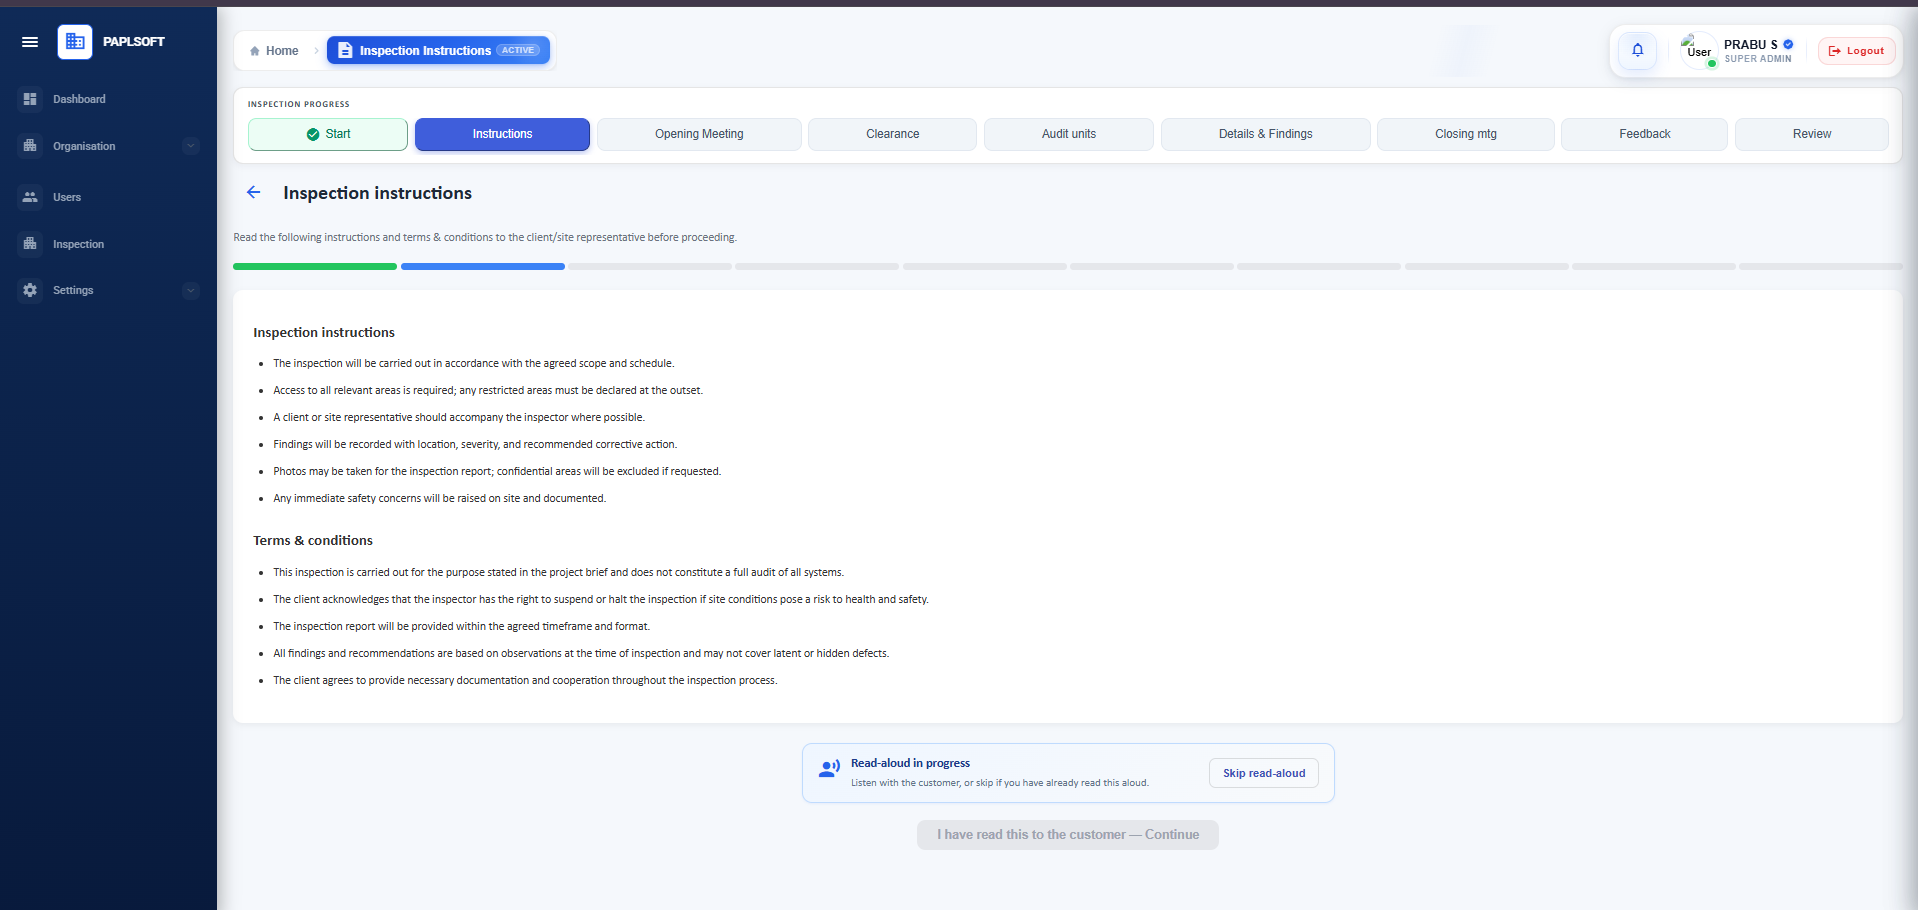
The "Read-aloud in progress" banner at the bottom indicates the system is ready. Use Skip read-aloud only if you have already read these instructions to the client in a prior session.
The instructions cover the scope, confidentiality, client obligations, and the inspector's right to halt the inspection if safety is at risk. After reading them aloud, click "I have read this to the customer — Continue".
💡
The instructions page uses a step progress bar. Only the first two steps (Start and Instructions) will be green at this point — the rest fill in as you complete each stage.
Stage 3 — Opening Meeting
The Opening Meeting records the formal start of the inspection, who was present, and confirms scope and access. This stage requires at least one attendee with a captured signature.
3 Opening Meeting — full page view
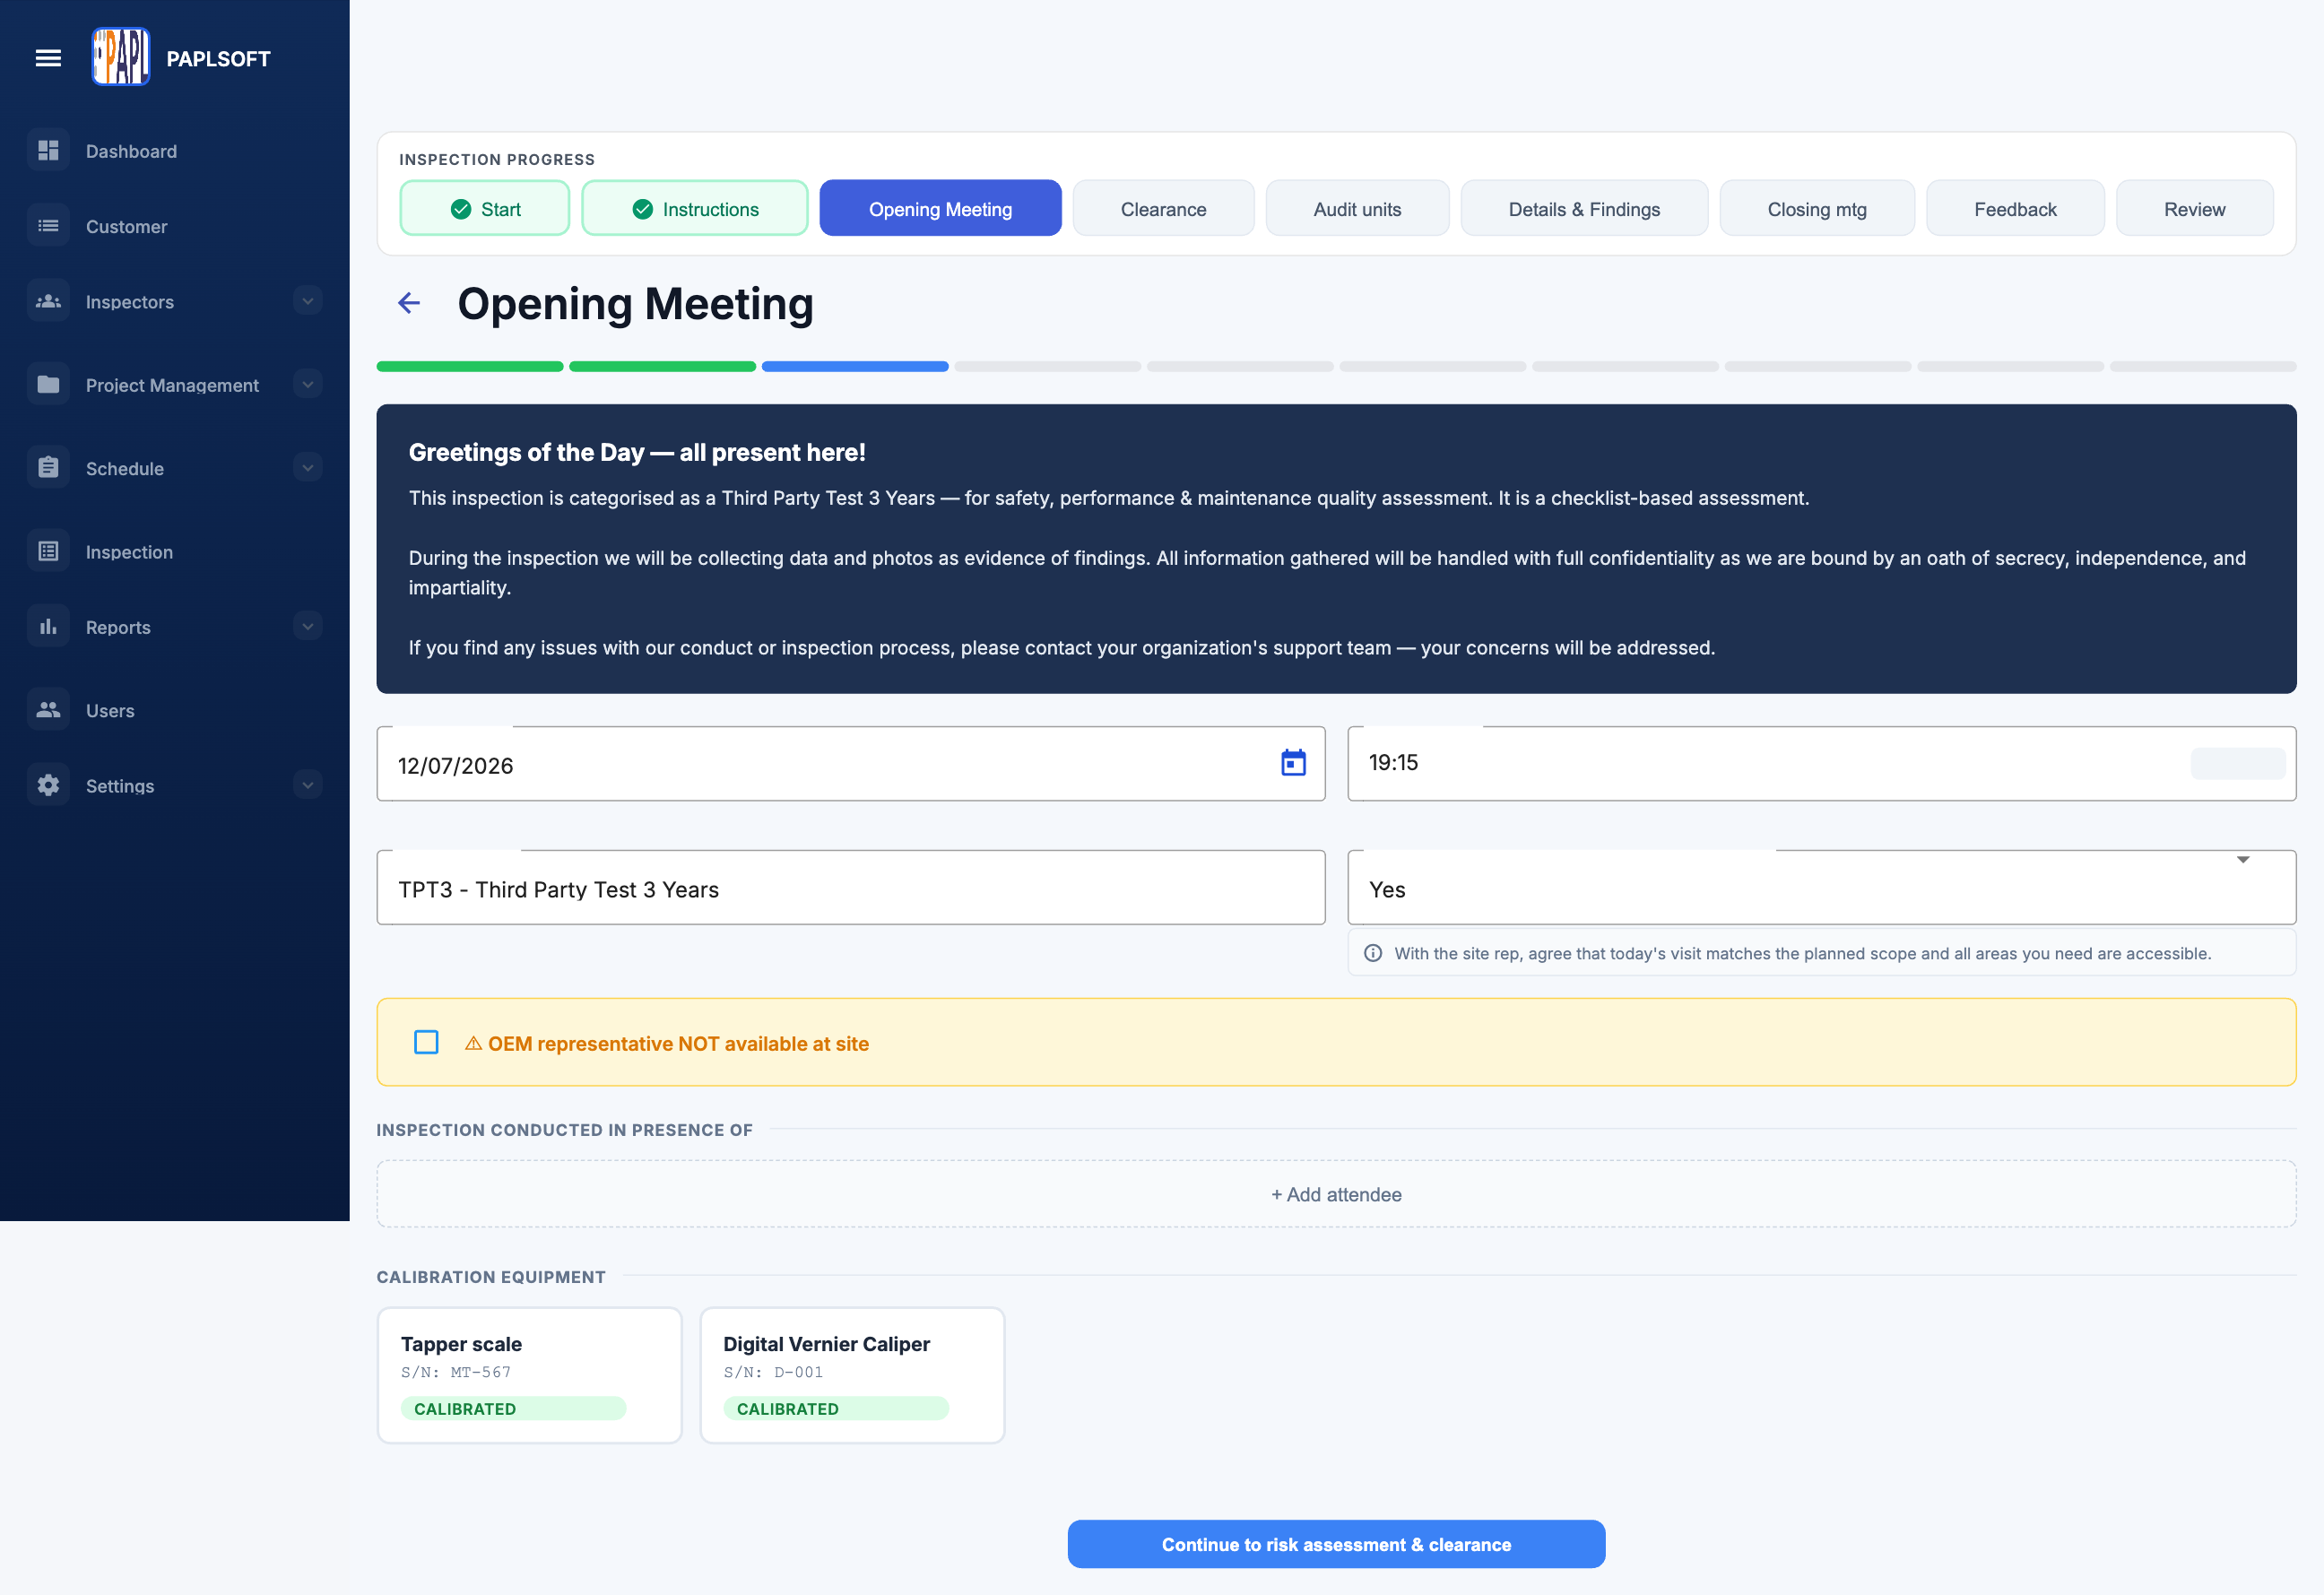
Fill in the meeting date and time (DD/MM/YYYY format), confirm the inspection type, and set the scope confirmation dropdown. If the OEM representative is not on site, tick the warning checkbox — this is recorded in the report.
Adding Attendees
Click + Add Attendee to record each person present. For each attendee, enter their name, designation, role, company, and contact number. A digital signature is captured directly on screen — ask the attendee to sign using the touch screen or mouse.
4 Add Attendee dialog — capturing name, role, and signature
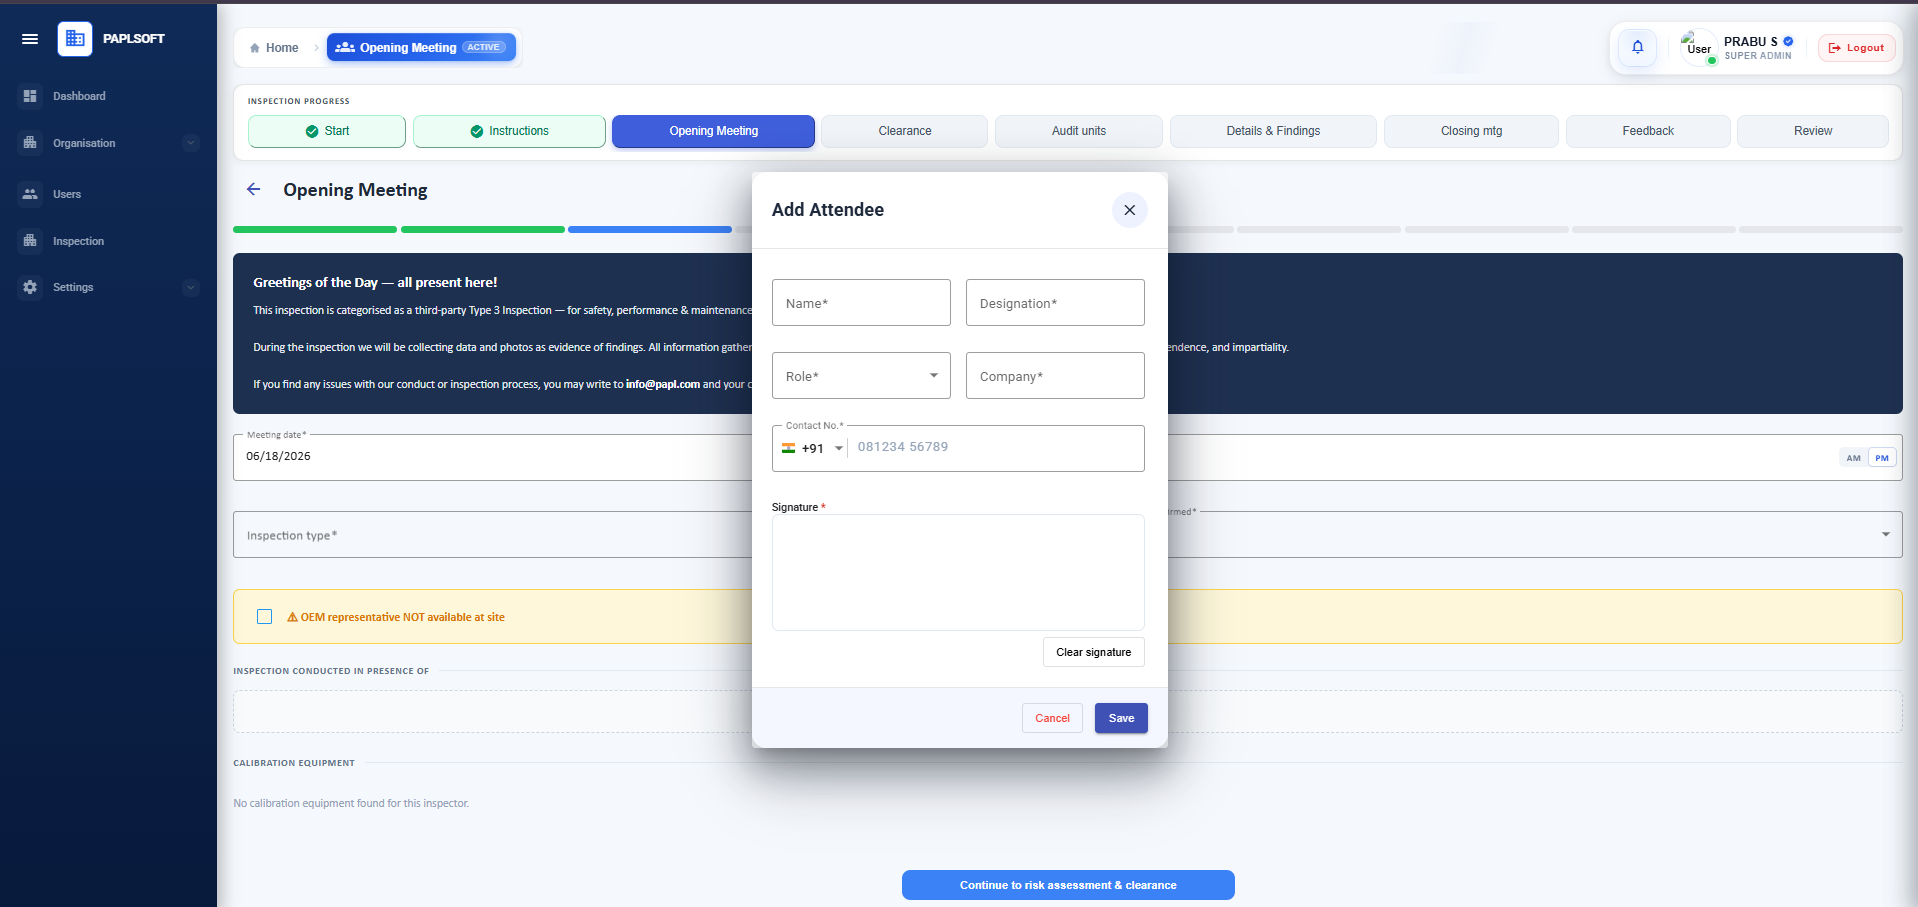
The signature field is a touch/mouse-draw area. Click "Clear signature" to redo if the signature is unclear. Tap Save to add the attendee to the meeting record.
Calibration Equipment
Below the attendees section, the Calibration Equipment list shows all measuring instruments assigned to this inspection (e.g. Tapper Scale, Digital Vernier Caliper). Each instrument displays its calibration status — a green CALIBRATED badge confirms the tool is within its calibration period and approved for use on site.
4a Calibration Equipment — CALIBRATED badges

Each instrument shows its serial number and a green CALIBRATED badge. If any instrument shows an expired or missing calibration, contact your administrator before proceeding.
After adding all attendees and verifying the calibration equipment status, click Continue to risk assessment & clearance.
Stage 4 — On-Site Risk Assessment & Clearance
Before commencing the inspection, the inspector must confirm that the site is safe to proceed. The Clearance screen presents a safety checklist — each item must be marked Yes or No.
5 On-Site Risk Assessment & Clearance — safety checklist
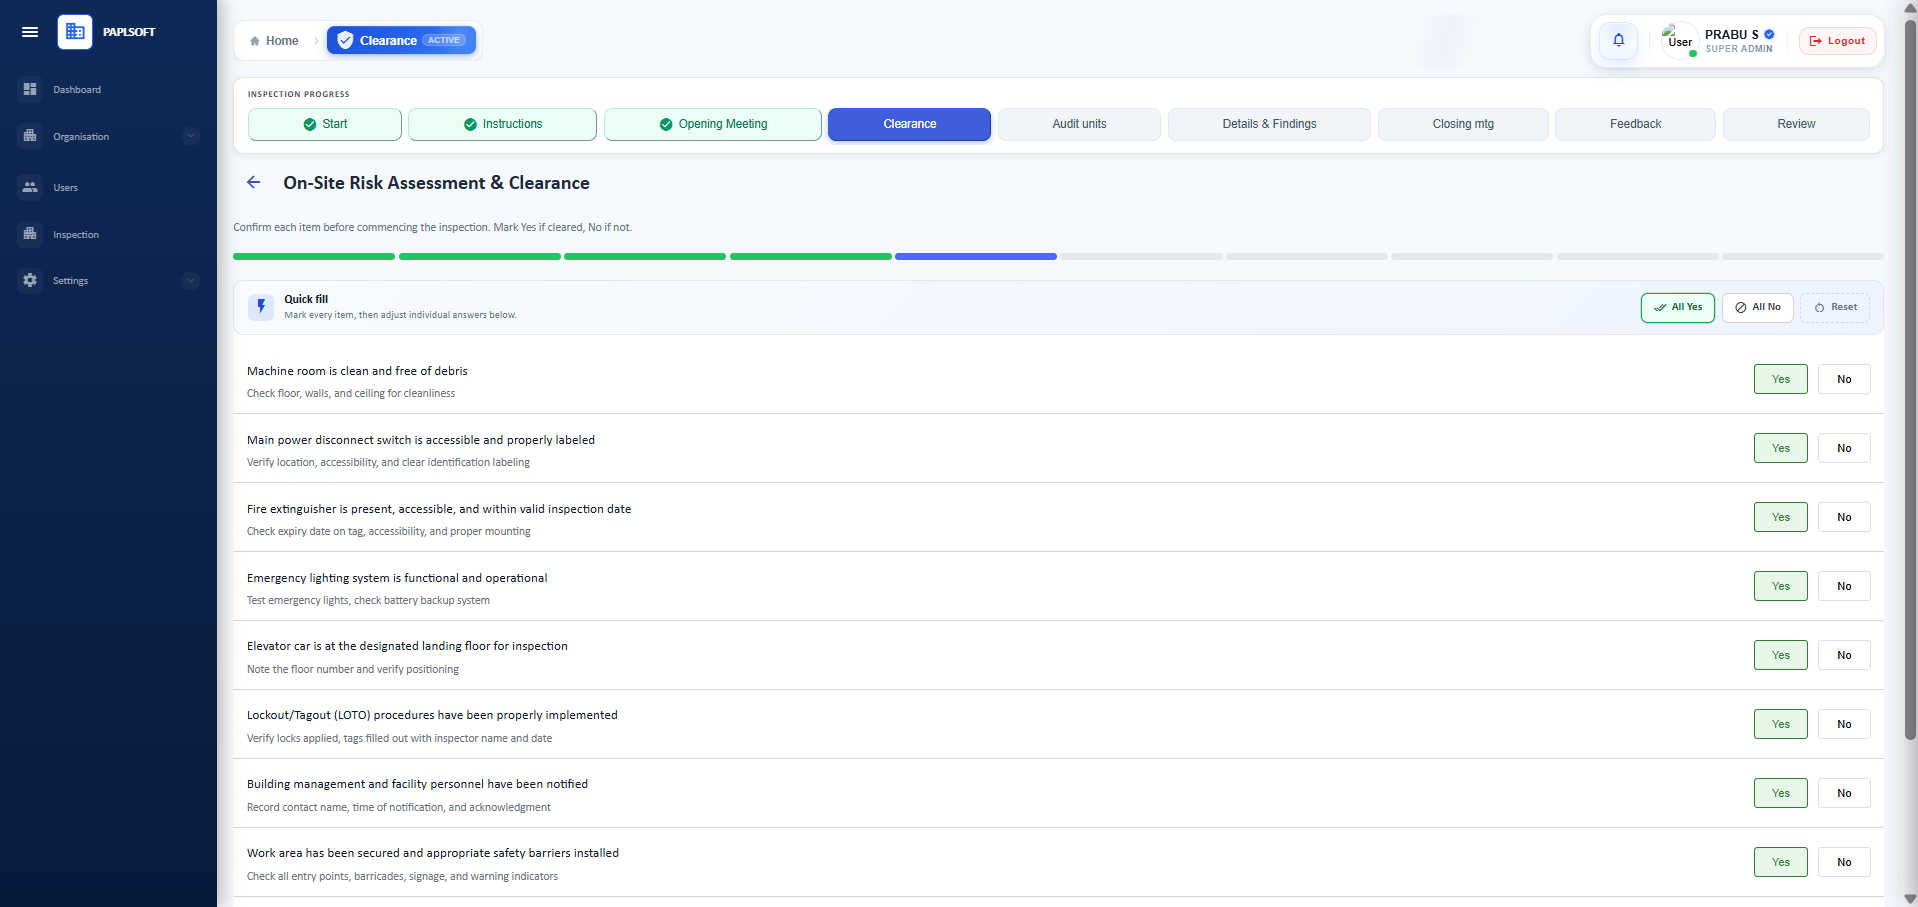
Use the Quick Fill toolbar (All Yes / All No / Reset) to bulk-answer items, then adjust any individual exceptions. All items must be answered before you can proceed.
6 Clearance checklist — full item list
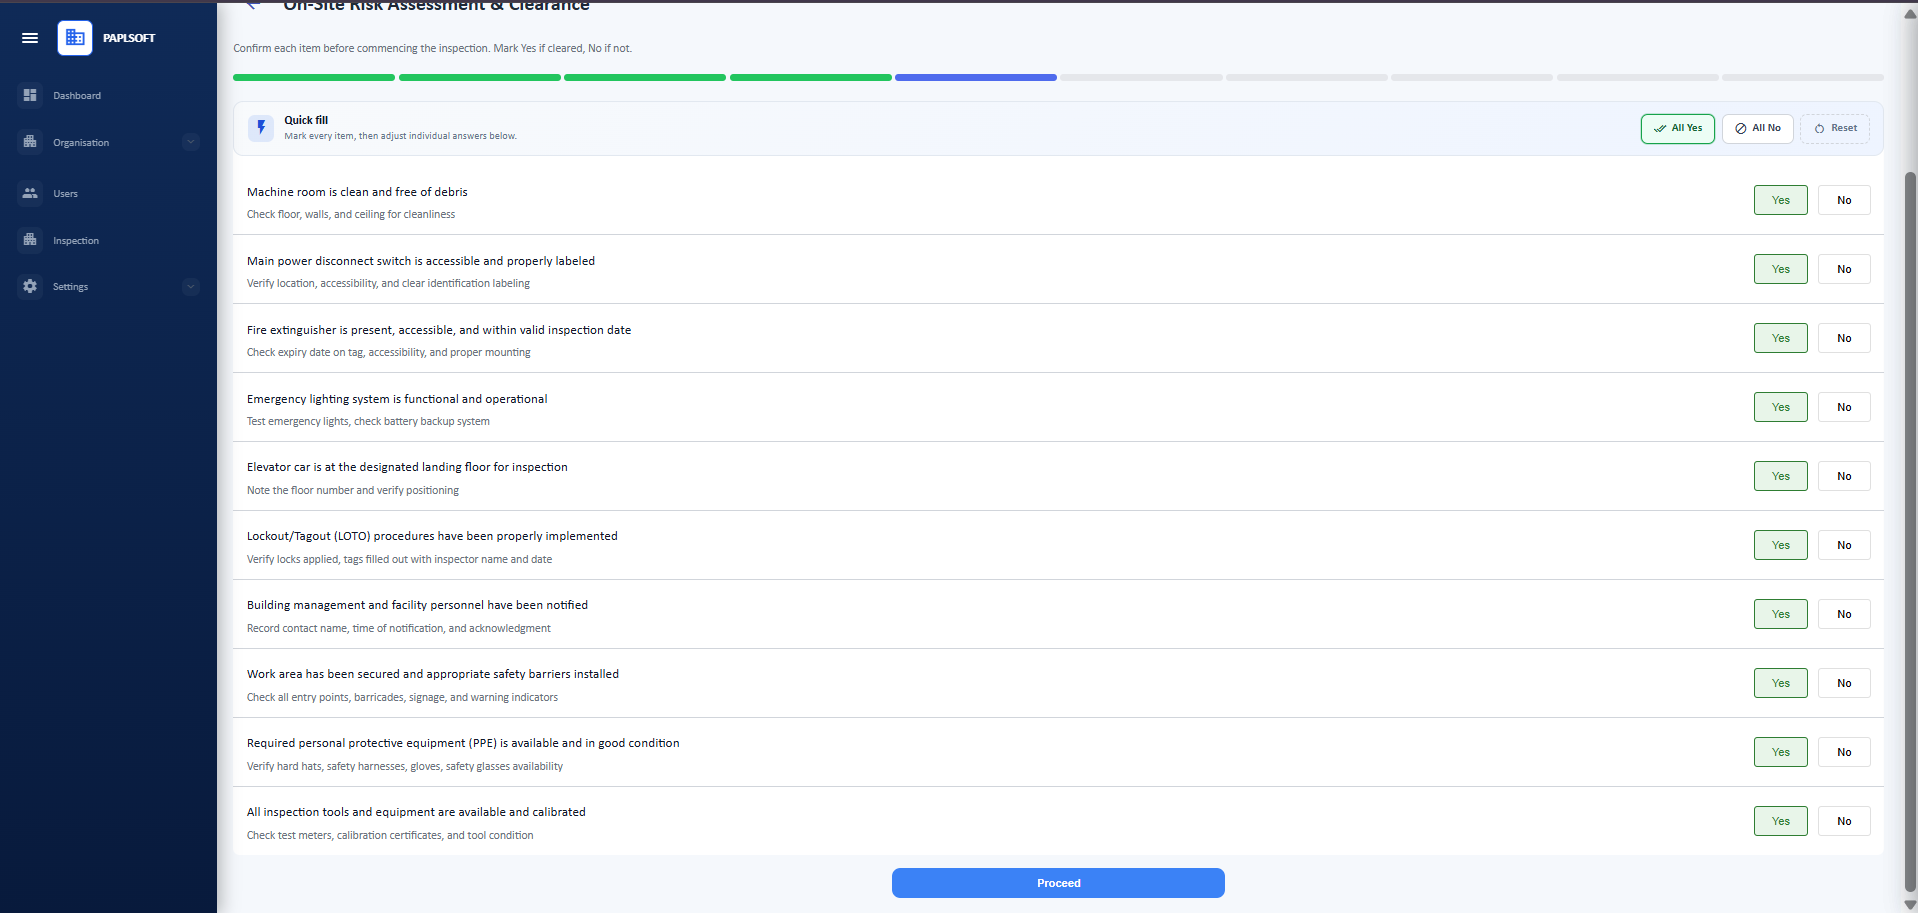
Items cover machine room condition, power disconnect, fire extinguisher, emergency lighting, LOTO procedures, PPE availability, and calibration of inspection tools. All must pass before the audit begins.
If any item is marked No, flag the issue immediately with the site supervisor. You may not be able to proceed with the inspection until safety concerns are resolved. Once all items are confirmed, click Proceed.
Stage 5 — Commence Audit (Select Units)
The Commence Audit page shows all equipment units assigned to this inspection. Each unit is displayed as a card with a circular progress indicator showing how many checkpoints have been synced (e.g. 0/125). Units may also show a Shutdown Notice if applicable.
7 Commence Audit — unit cards with checkpoint progress
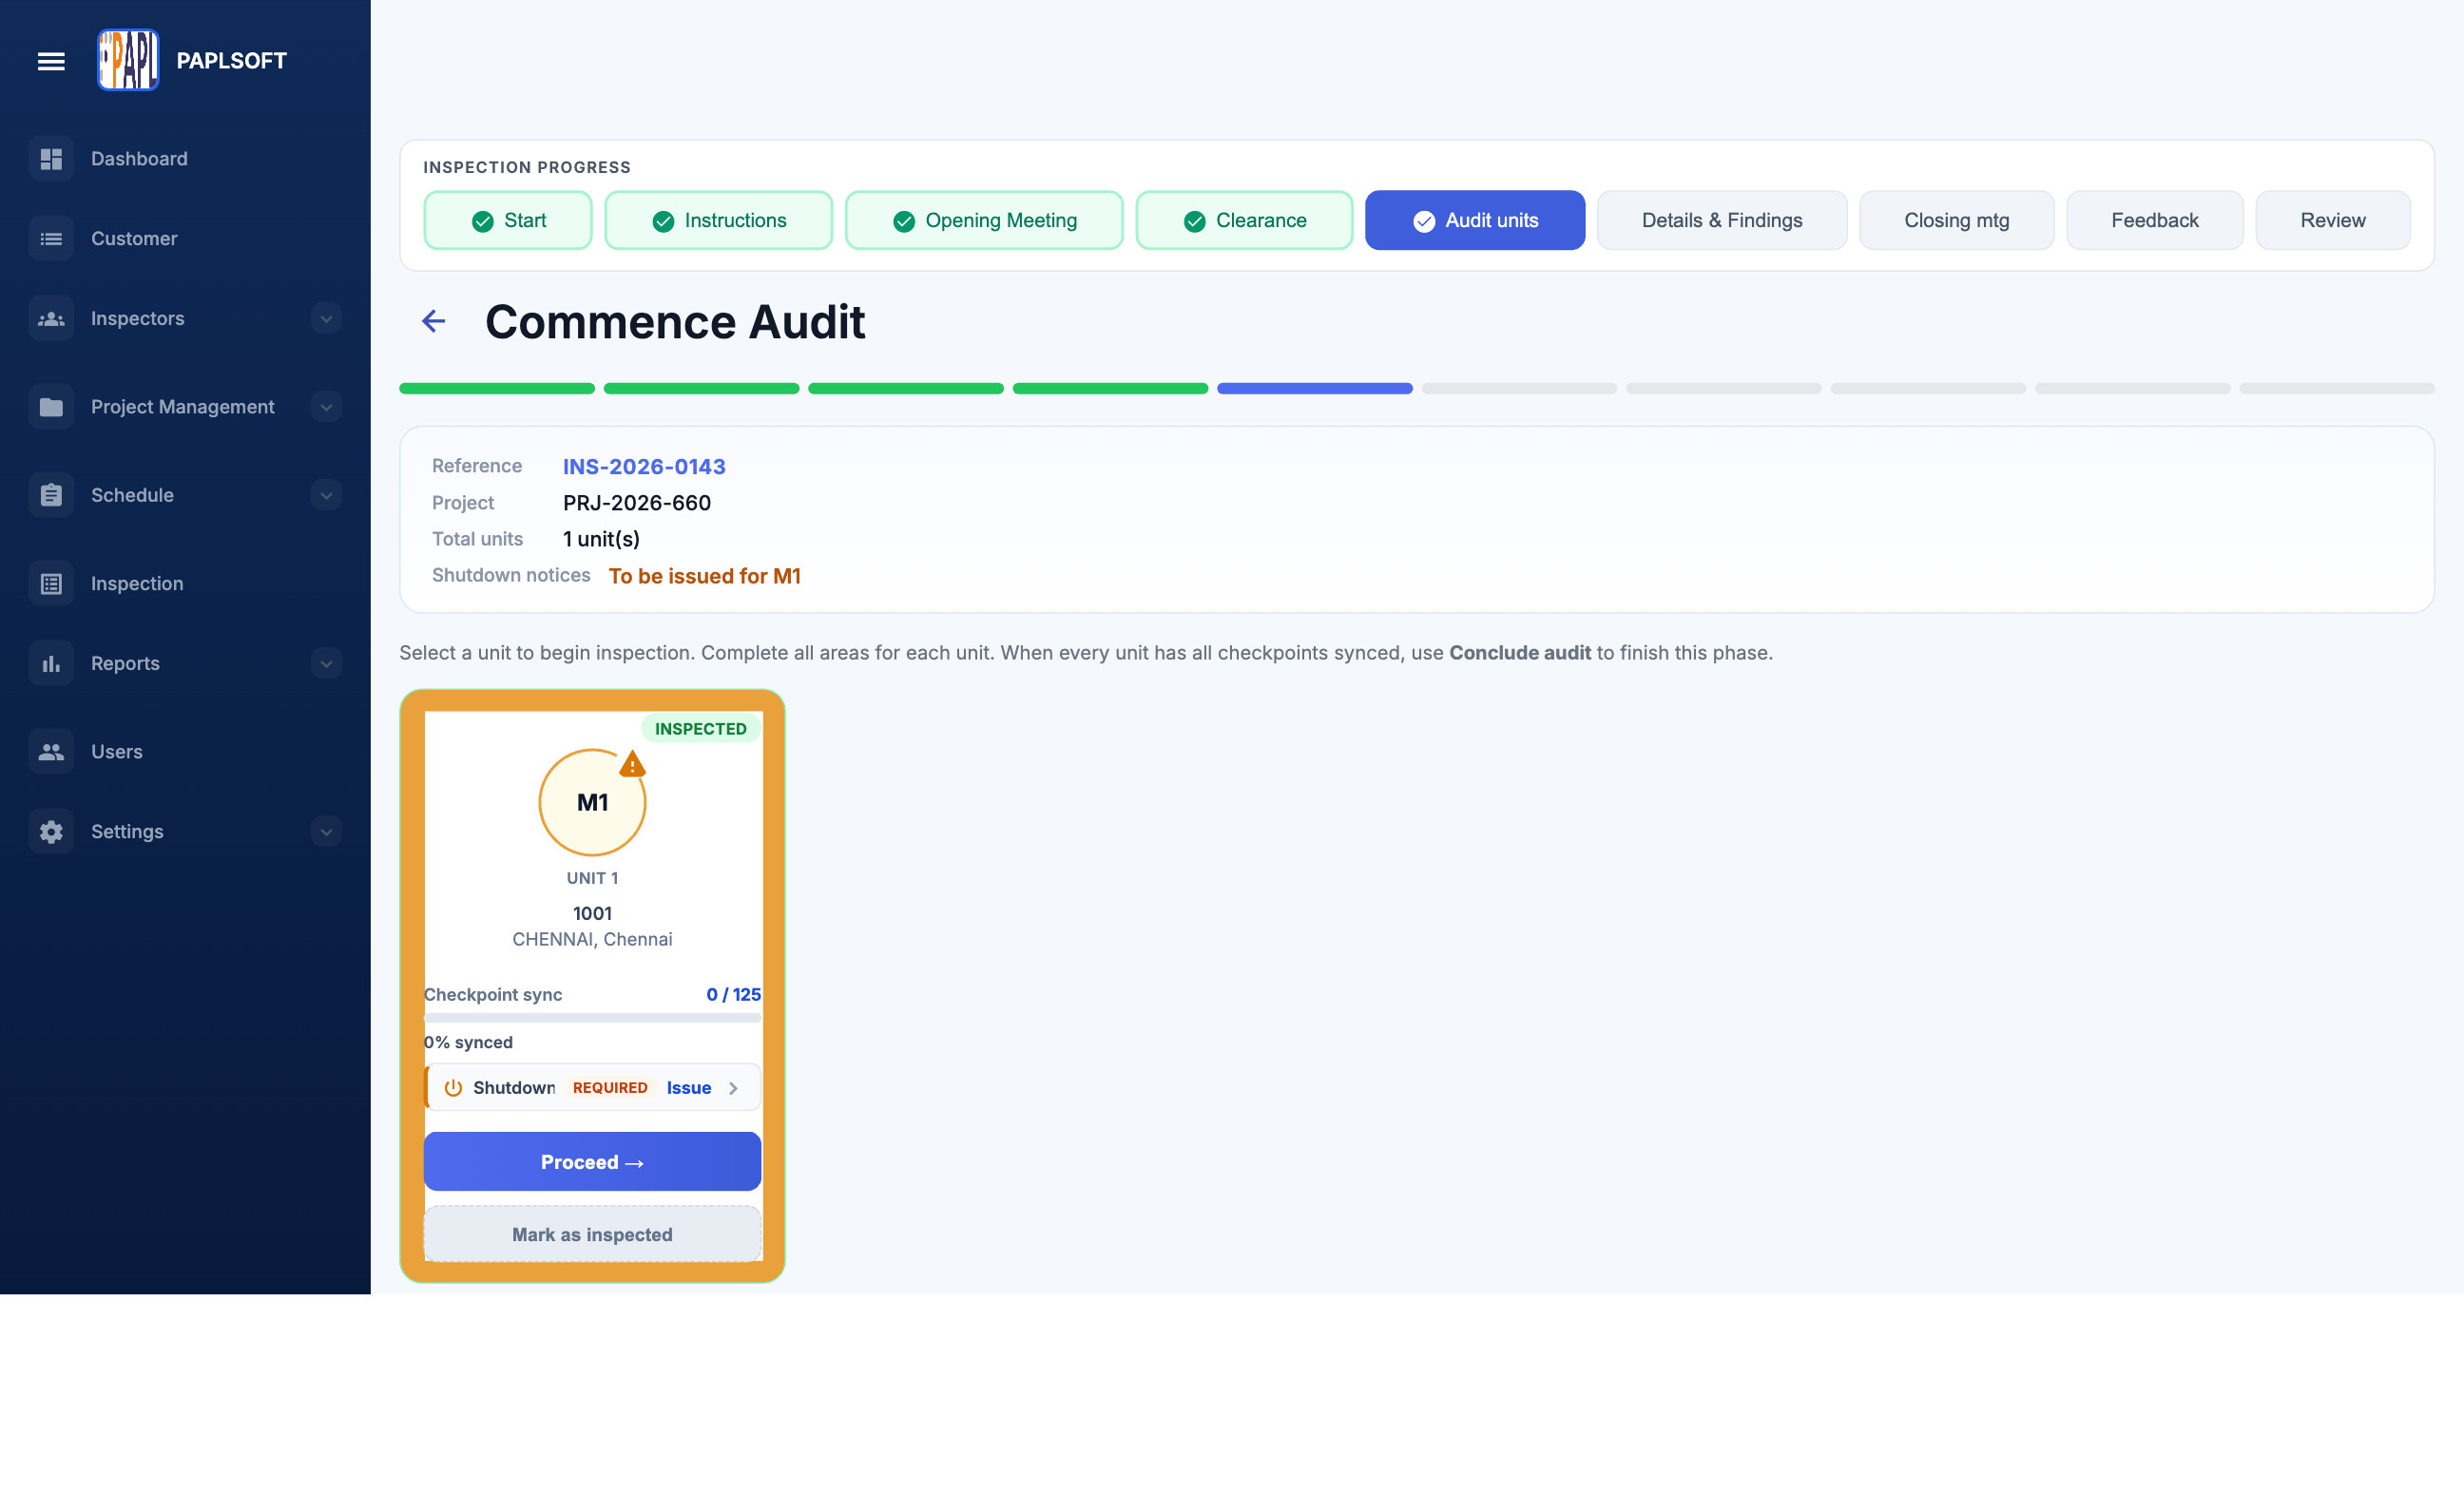
Each card shows the unit identifier, the circular progress ring for checkpoint sync (e.g. 0/125 checkpoints), and action buttons. Click Proceed → to begin recording findings for that unit, or Mark as inspected to flag a unit as done without entering findings. Multiple units can be worked through in sequence.
Stage 6 — Details & Findings
This is the core data-collection stage. Findings are recorded per unit, organized by area (e.g. Cabin, Car Top, Floor Landing, Machine Room, Pit) and within each area by checkpoint.
8 Details & Findings — area tabs and checkpoint overview
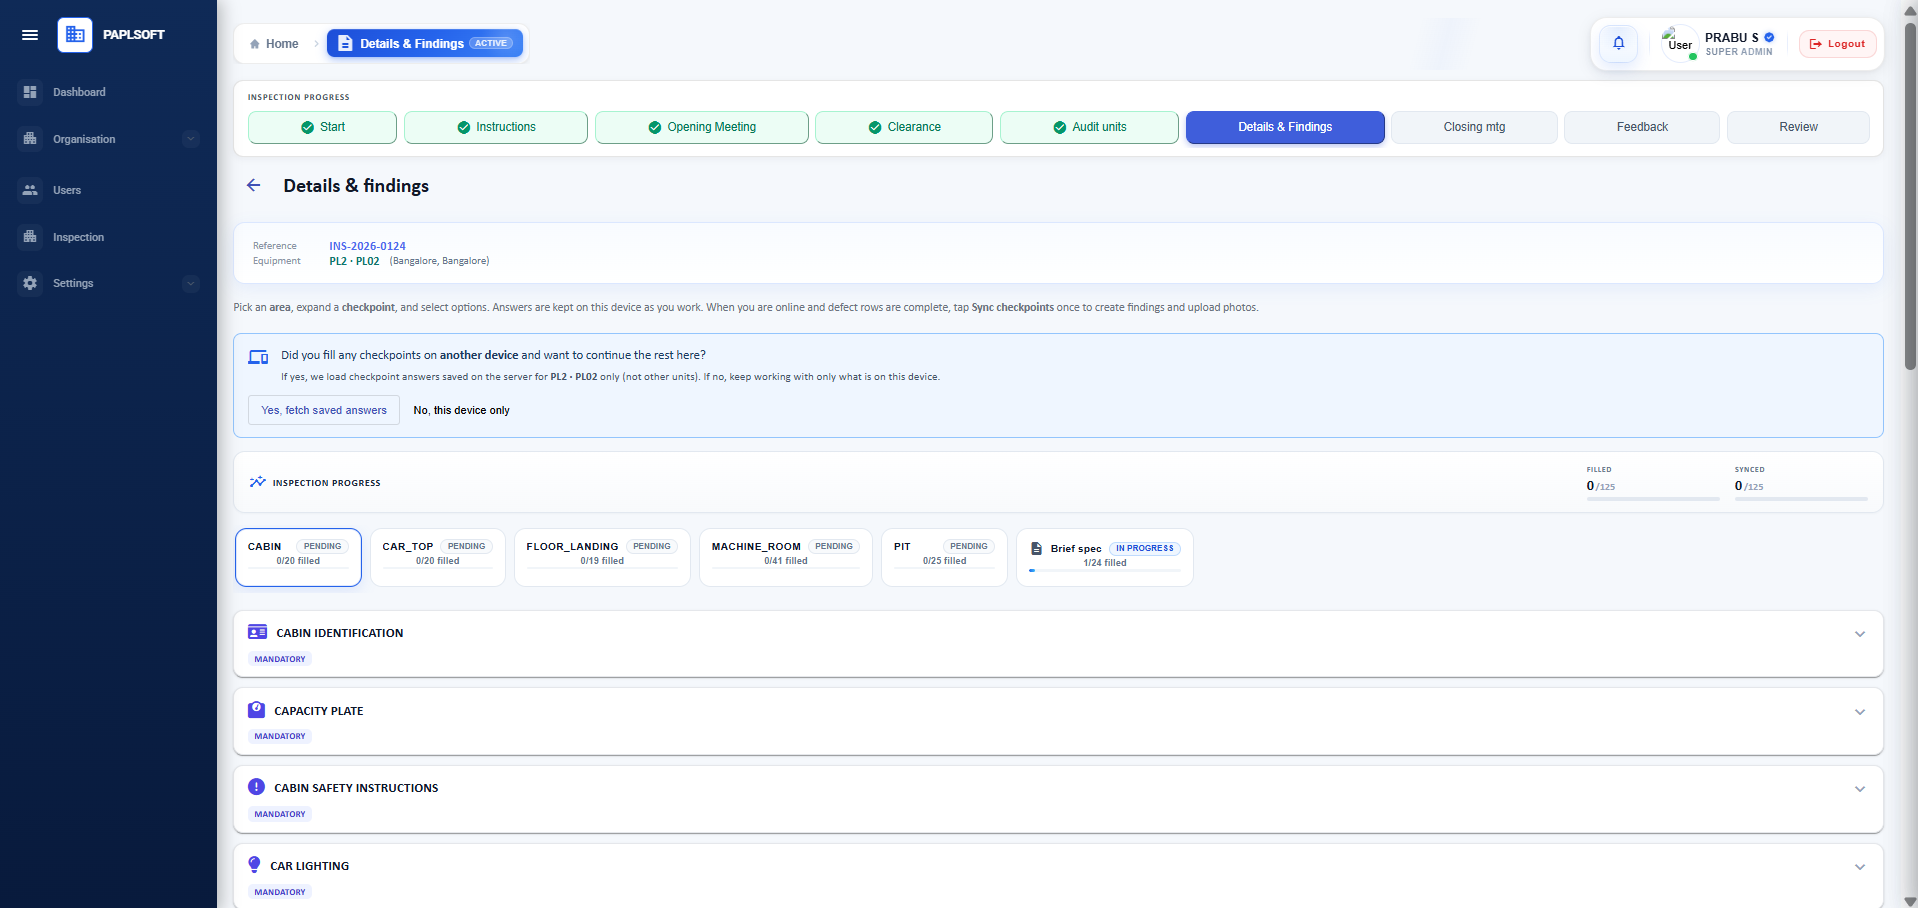
Area tabs at the top show fill progress per area (e.g. "CABIN 0/20 filled"). The Filled and Synced counters in the top-right track overall progress. If you started on another device, use "Yes, fetch saved answers" to load prior work before continuing.
Working Through Checkpoints
Click on an area tab, then expand a checkpoint section. Each checkpoint contains one or more defect options (e.g. "Cabin identification missing", "Identification not visible") plus a Satisfactory option. Select all that apply.
9 Checkpoint — selecting a defect finding
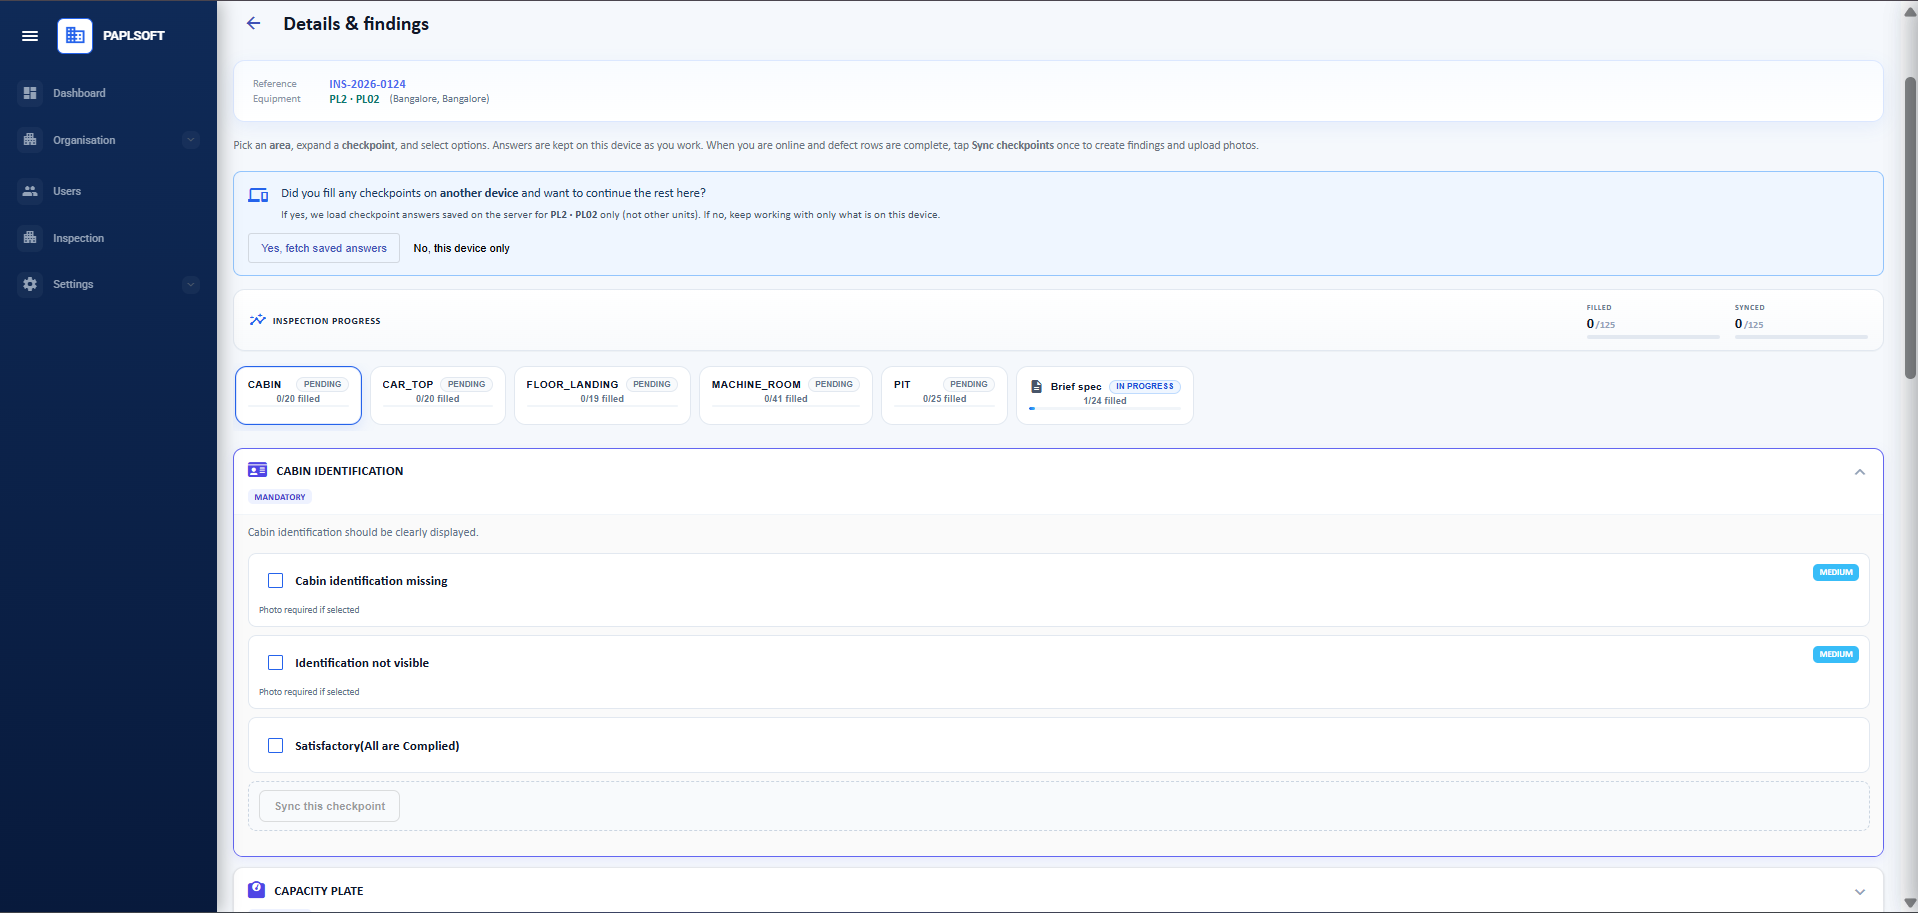
Each defect row shows a severity badge (MEDIUM, HIGH, CRITICAL). When a defect is selected, the system requires a photo if indicated by "Photo required if selected." Click "Sync this checkpoint" after completing each section to save to the server.
Attaching Photos to Findings
When a defect requiring a photo is checked, camera controls appear. Tap Retake (camera) to capture a new photo directly, or Gallery to upload from your device.
10 Photo capture — attaching evidence to a defect
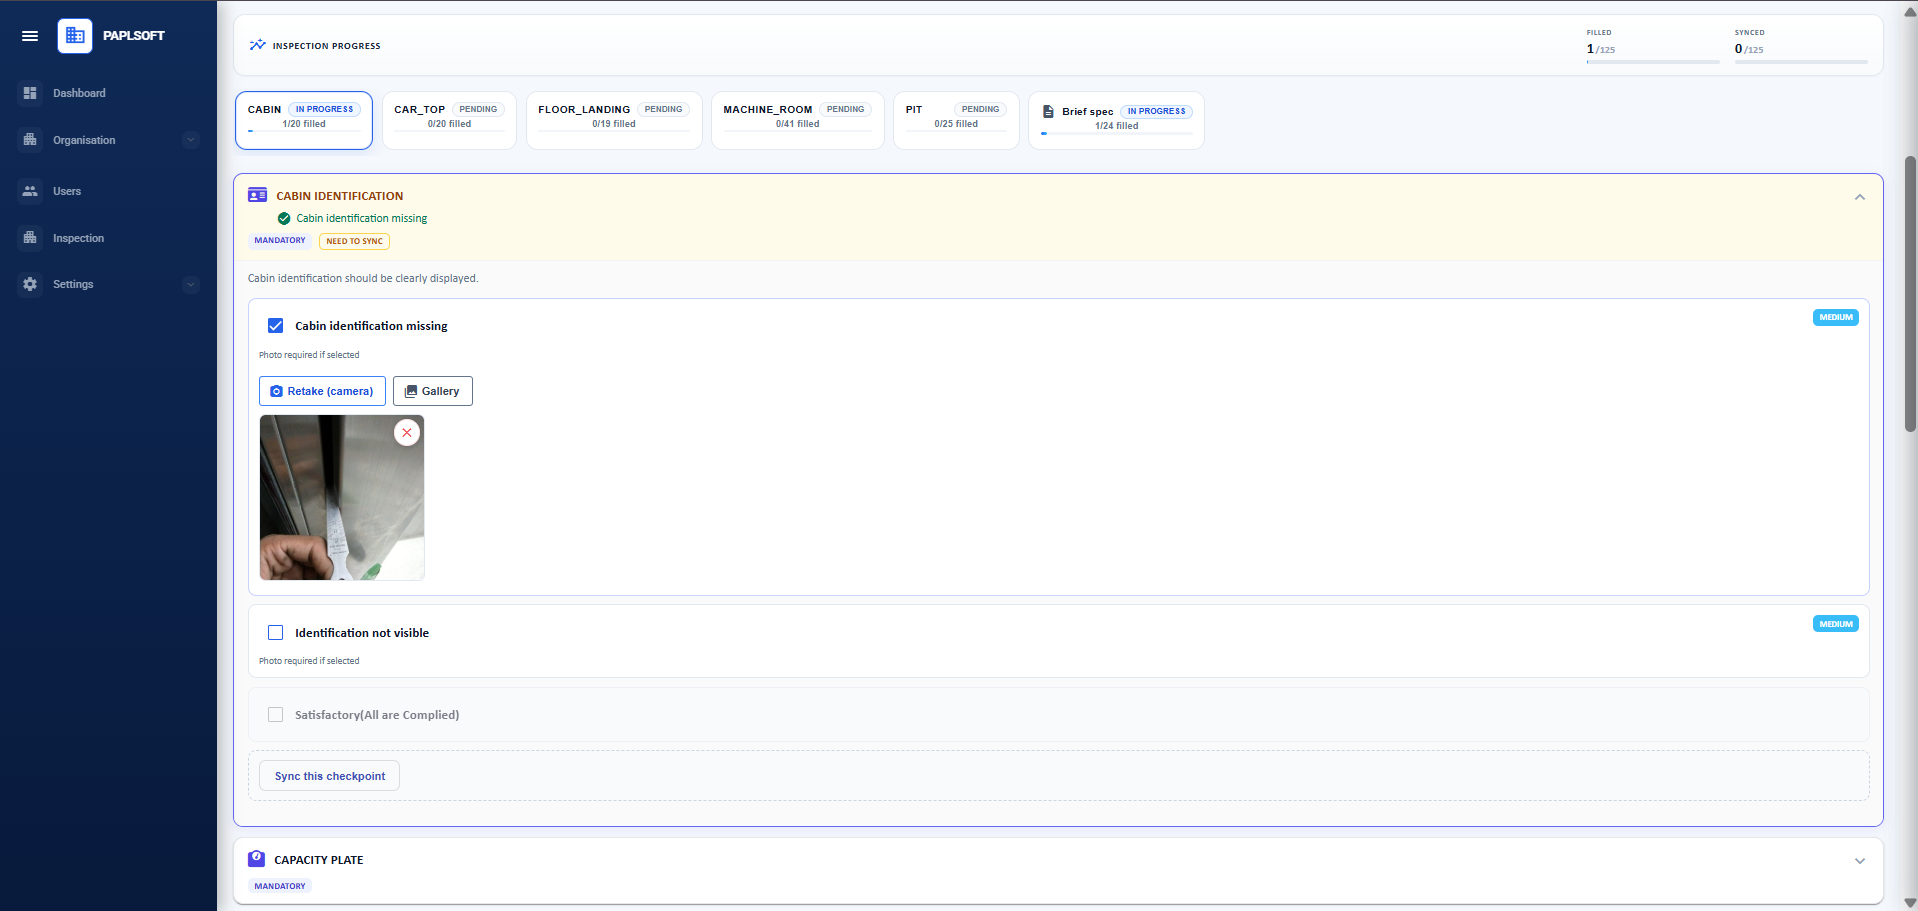
A thumbnail confirms the photo has been attached. The checkpoint header shows "NEED TO SYNC" until you tap "Sync this checkpoint" — do this whenever you have a network connection available.
Syncing Checkpoints
After completing and syncing a checkpoint, its badge changes from NEED TO SYNC to SYNCED and the row turns green. This confirms the data has been saved to the server.
11 Checkpoints after syncing — green SYNCED badges
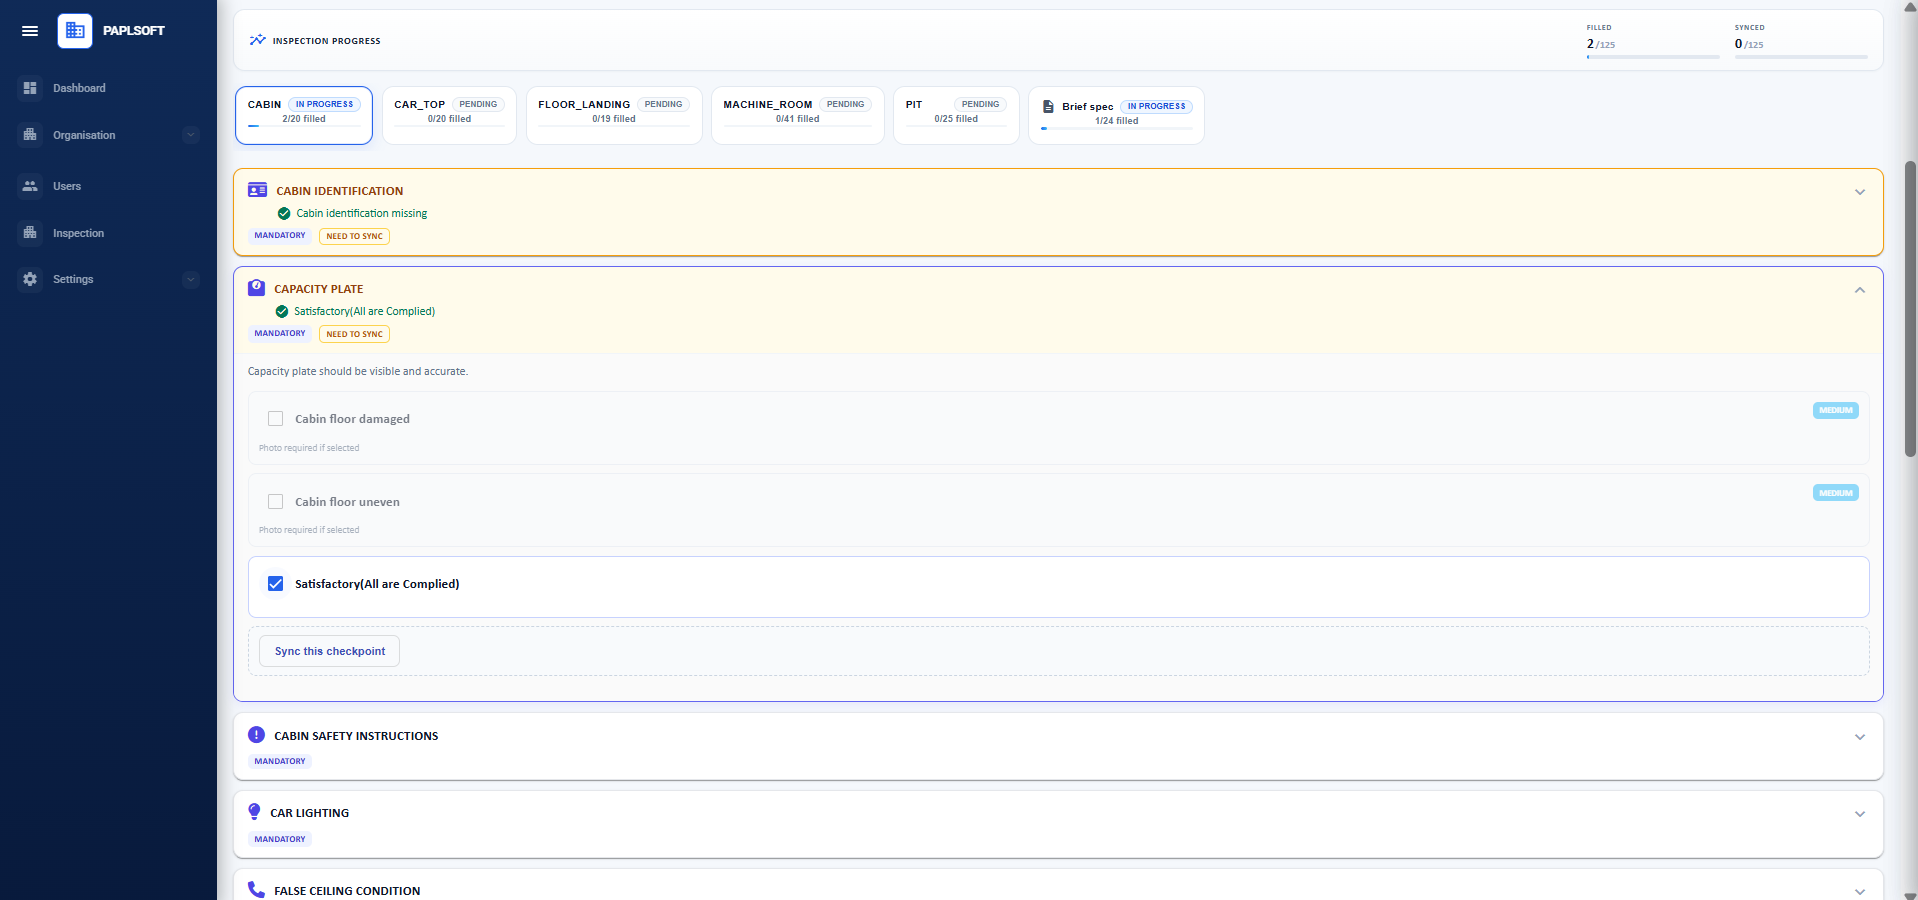
Synced checkpoints are highlighted green. Unsynced checkpoints with defects show "NEED TO SYNC" in amber. Always aim to sync checkpoints while on site when connectivity is available.
12 Multiple checkpoints completed with sync status
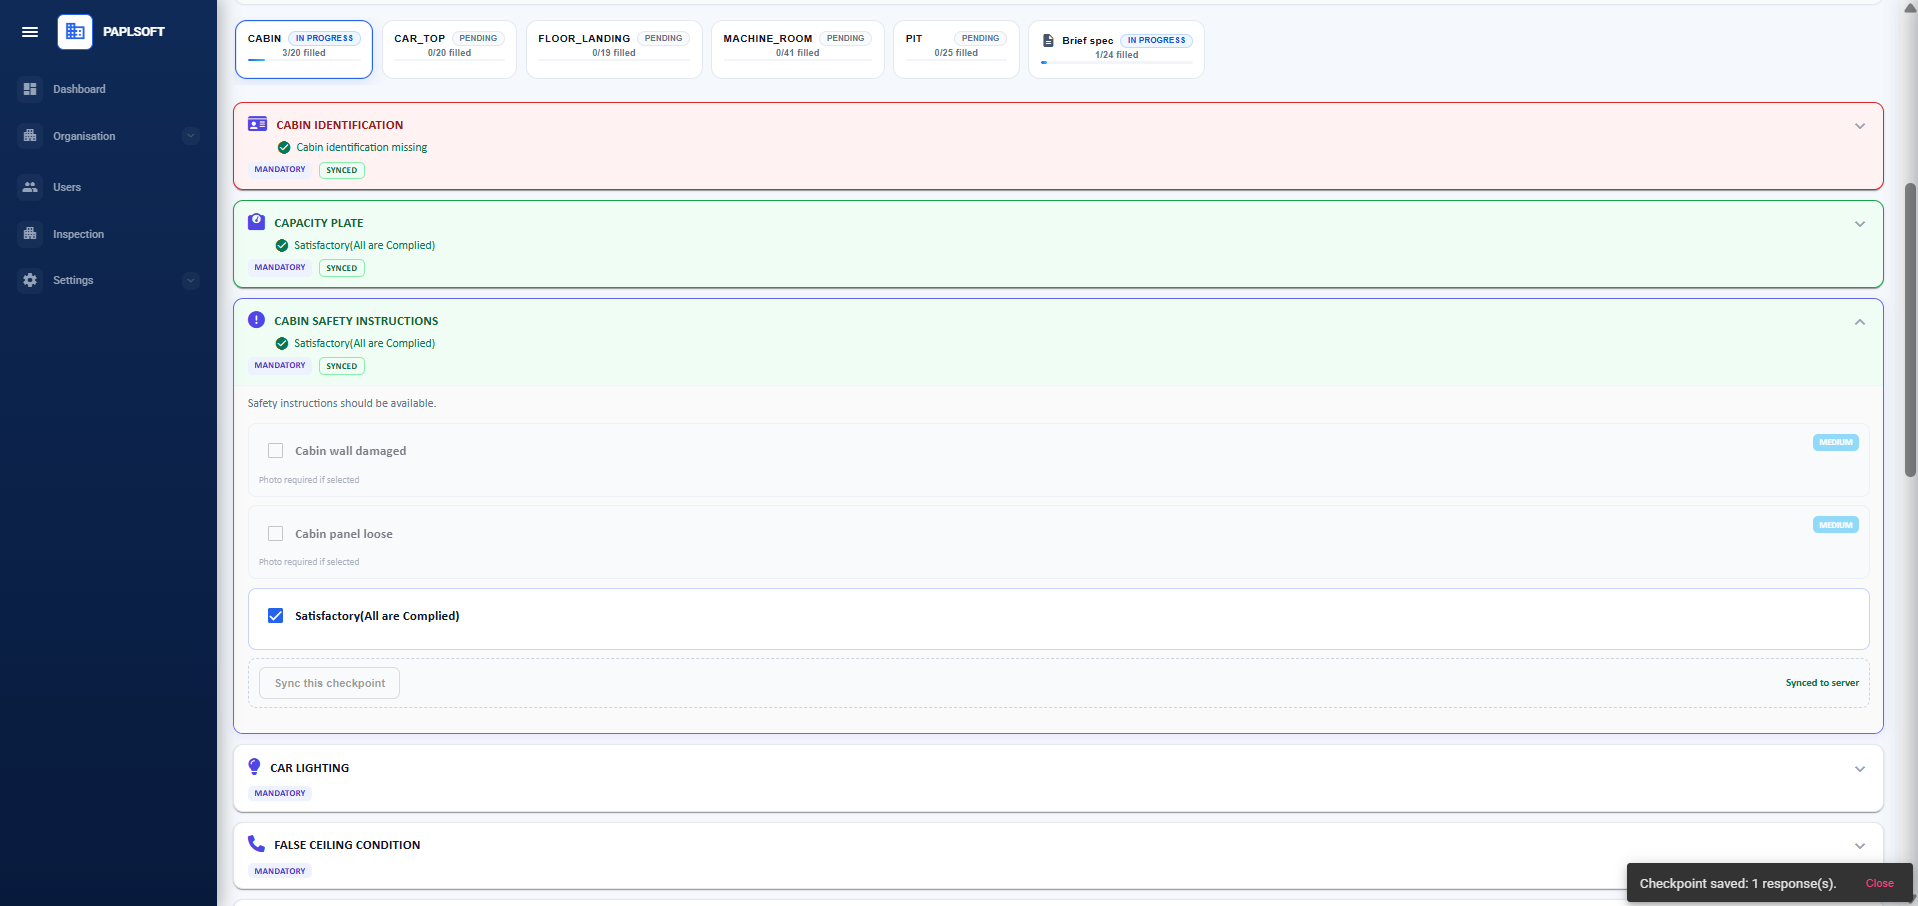
Work through each area tab completing all checkpoints. The area tab counter updates as you fill items (e.g. "CABIN 3/20 filled"). Continue across all areas — Car Top, Floor Landing, Machine Room, and Pit.
Brief Spec — Equipment Details
In addition to area-based checkpoints, each unit has a Brief Spec tab where you record the technical specification of the equipment being inspected (manufacturer, year, capacity, drive type, controller, safety features, etc.).
13 Brief Spec — equipment technical details form
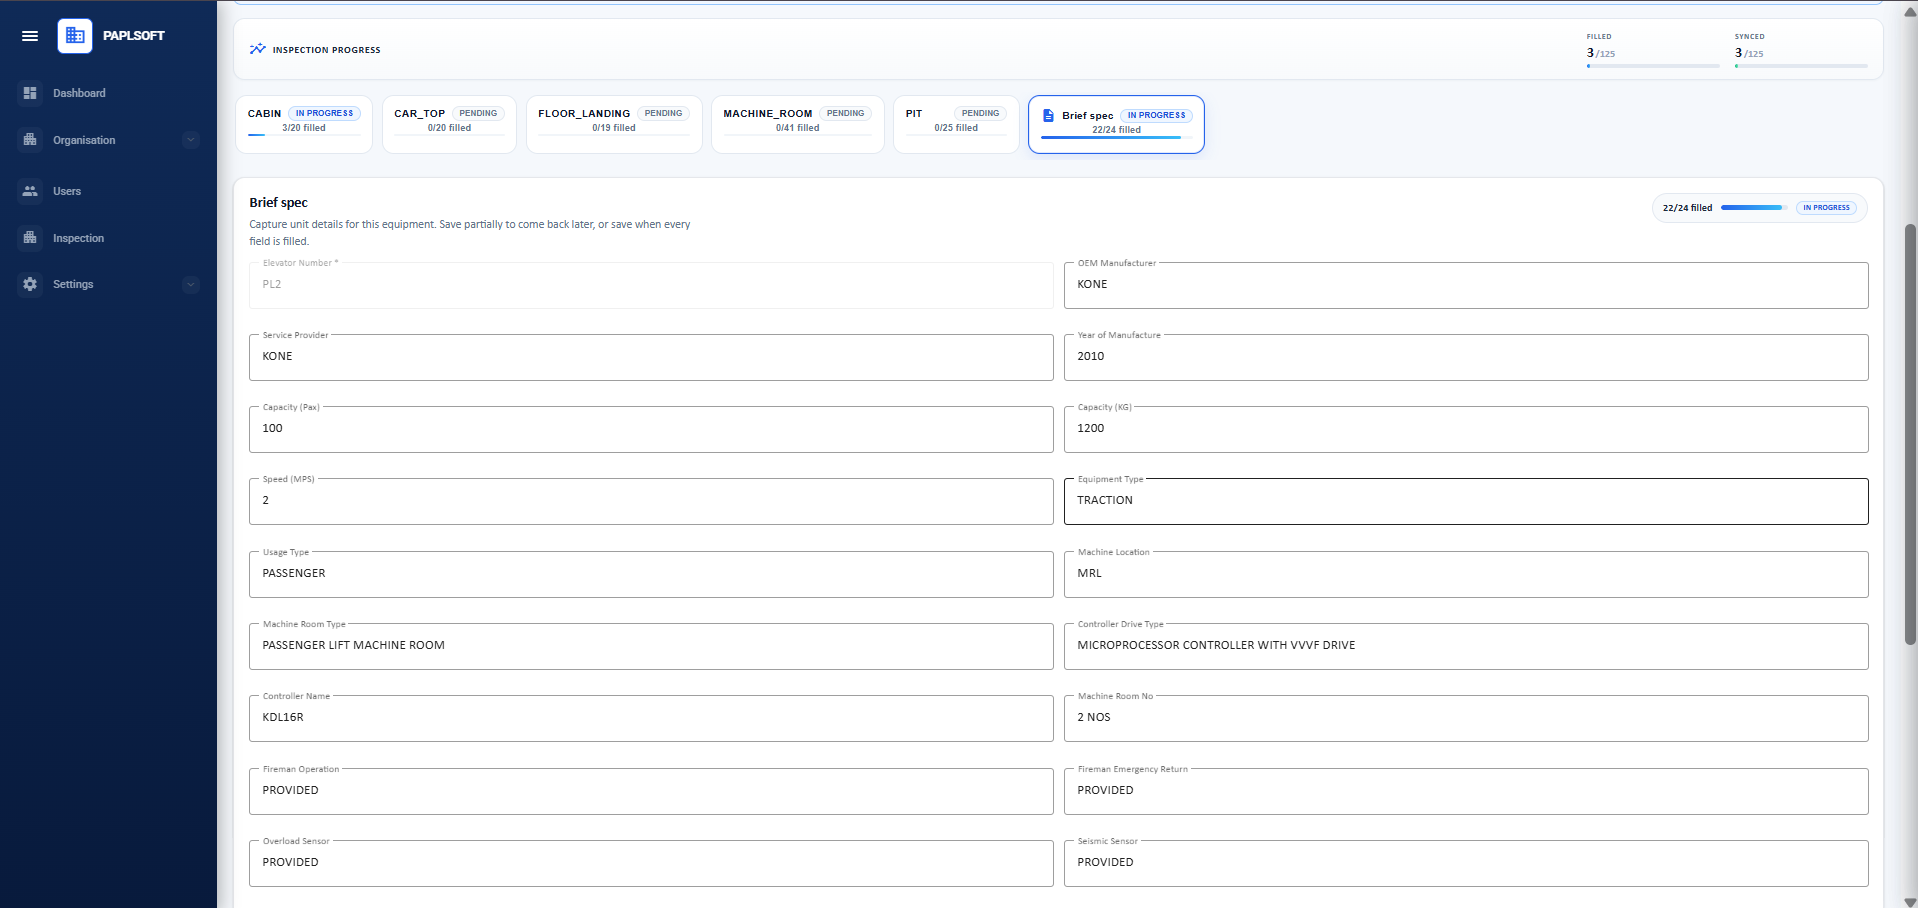
Fill all fields shown. The form tracks completion ("22/24 filled"). Use "Save partial" to save progress and come back later. "Save brief spec" is only enabled once all required fields are filled.
14 Brief Spec — lower section with safety features and notes
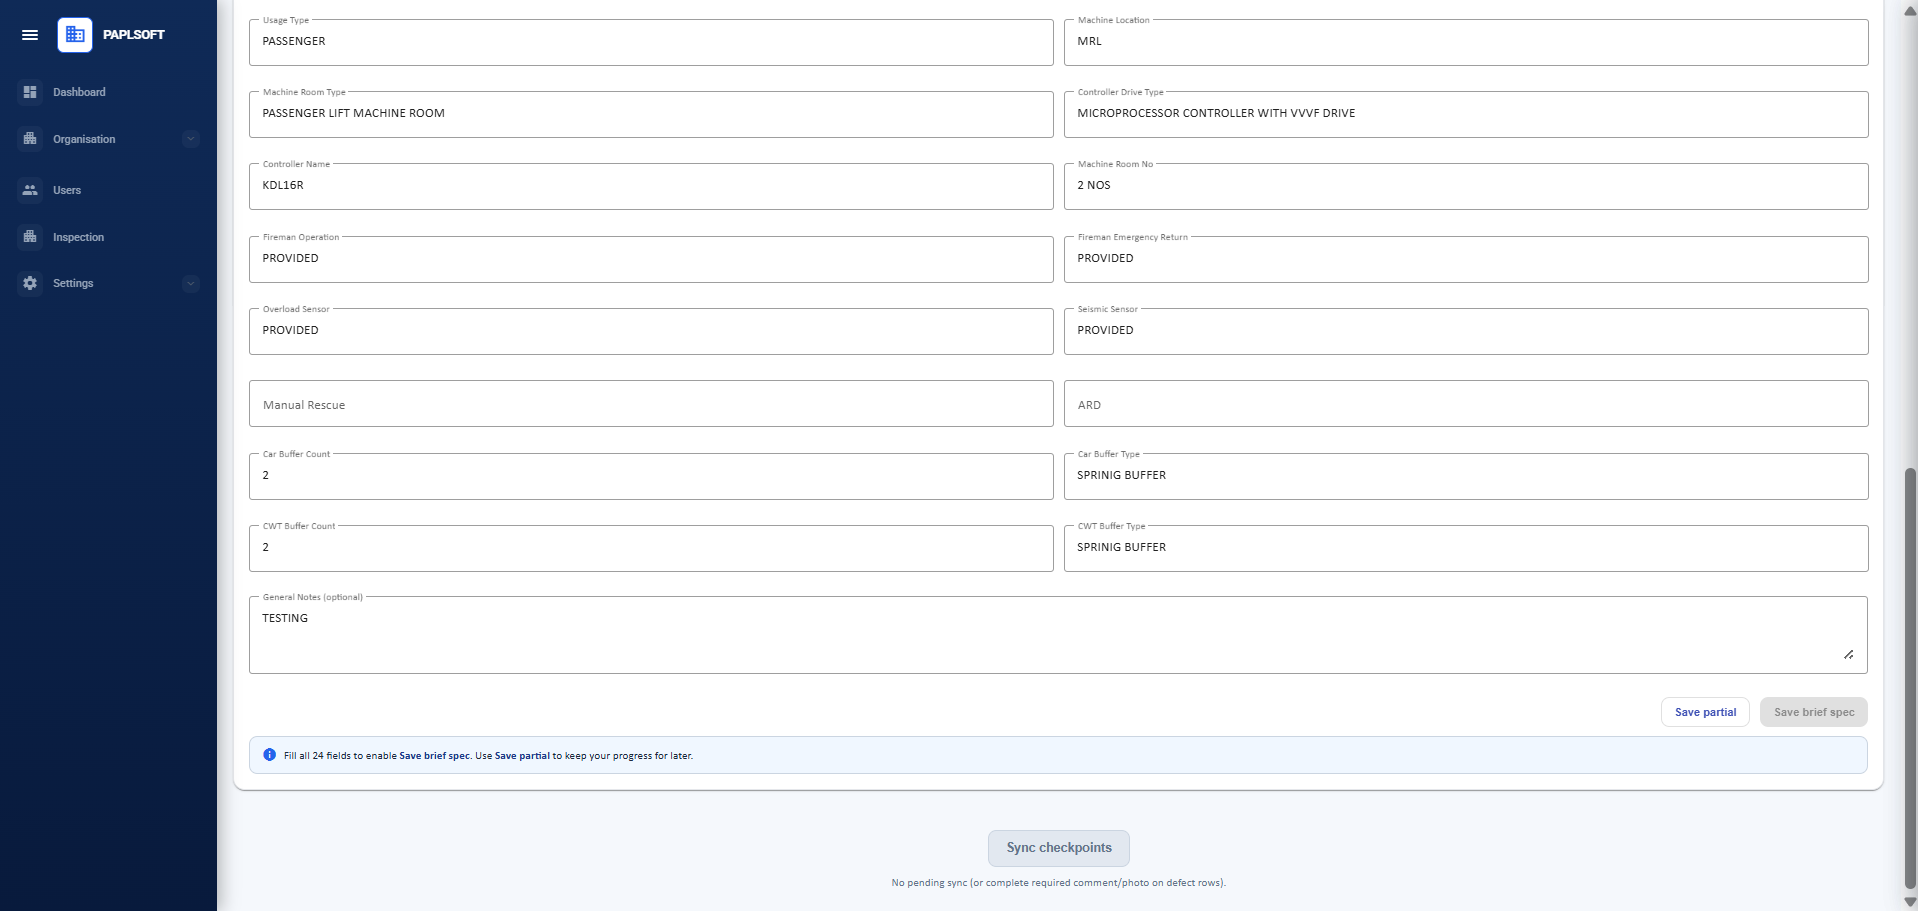
Fields include fireman operation, emergency return, overload sensor, seismic sensor, buffer types, and general notes. Once all 24 fields are filled, the "Save brief spec" button activates. After saving, click "Sync checkpoints" at the bottom of the page.
⚠️
Offline behaviour: Checkpoint answers are cached on your device as you work. When online, tap Sync this checkpoint after each section to push data to the server. Do not rely solely on the device cache — sync whenever a network connection is available.
Stage 7 — Closing Meeting & Work Completion
After all findings are recorded, the Closing Meeting stage formally closes the on-site visit. This records the closing meeting details, any acknowledgements, and captures the client representative's signature as a Work Completion Sign-off.
15 Closing Meeting — meeting details and sign-off form
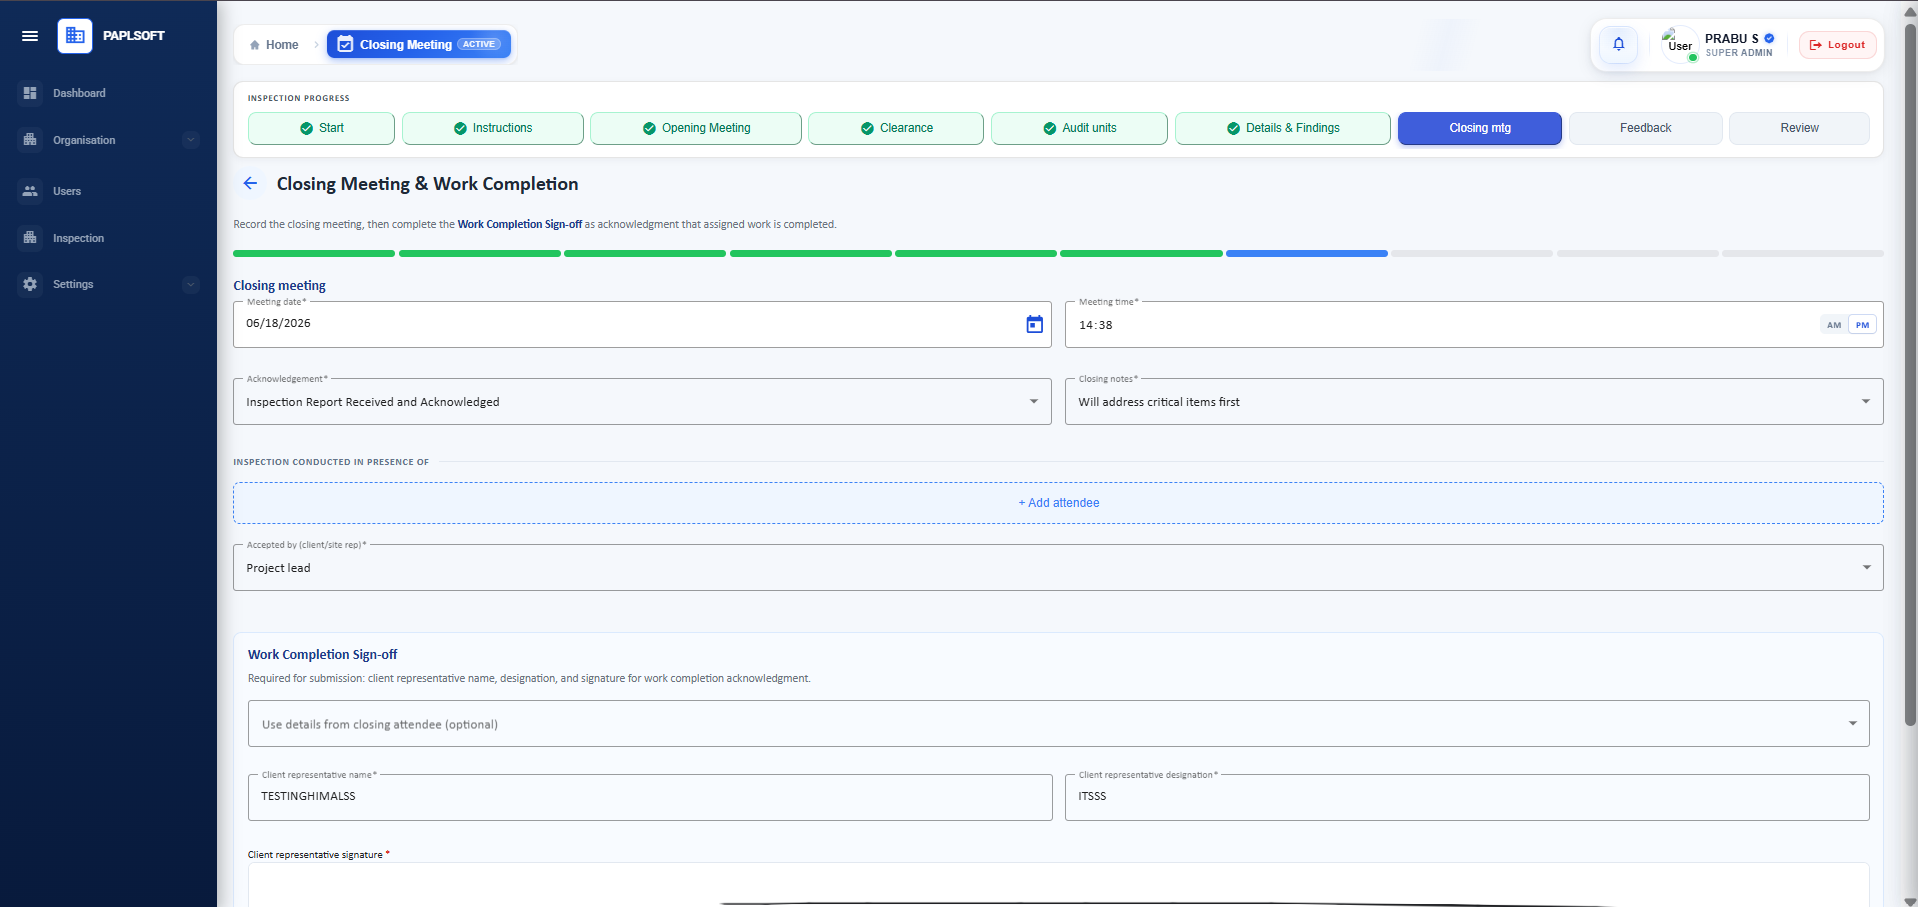
Record the closing date and time, acknowledgement type (e.g. "Inspection Report Received and Acknowledged"), and closing notes. The Work Completion Sign-off section below requires the client representative's name, designation, and signature.
Adding Closing Meeting Attendees
Use + Add Attendee to record who was present at the closing meeting. As with the Opening Meeting, a digital signature is captured for each attendee.
16 Closing Meeting — Add Attendee with signature
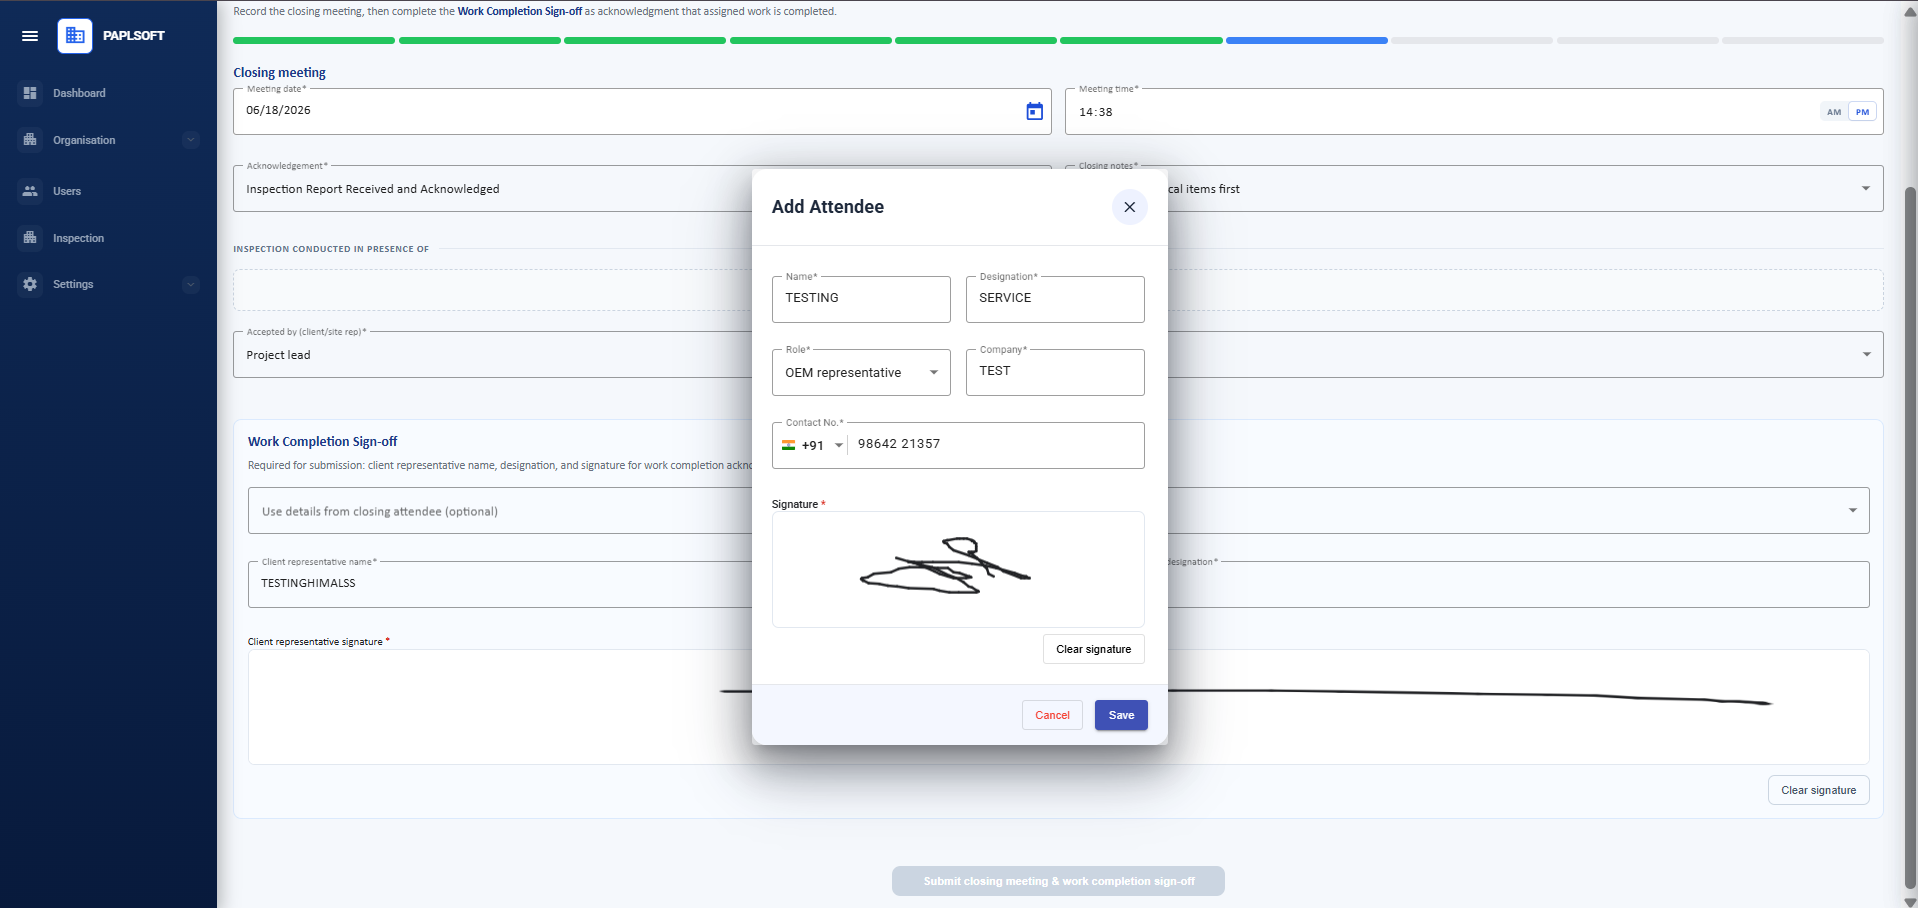
Enter the attendee's name, designation, role, company, and phone number. Capture their signature in the signature pad. Tap Save to record the attendee.
Work Completion Sign-off
The Work Completion Sign-off is required for submission. The client representative must sign directly on the screen to acknowledge that the inspection work has been completed.
17 Work Completion Sign-off — client representative signature
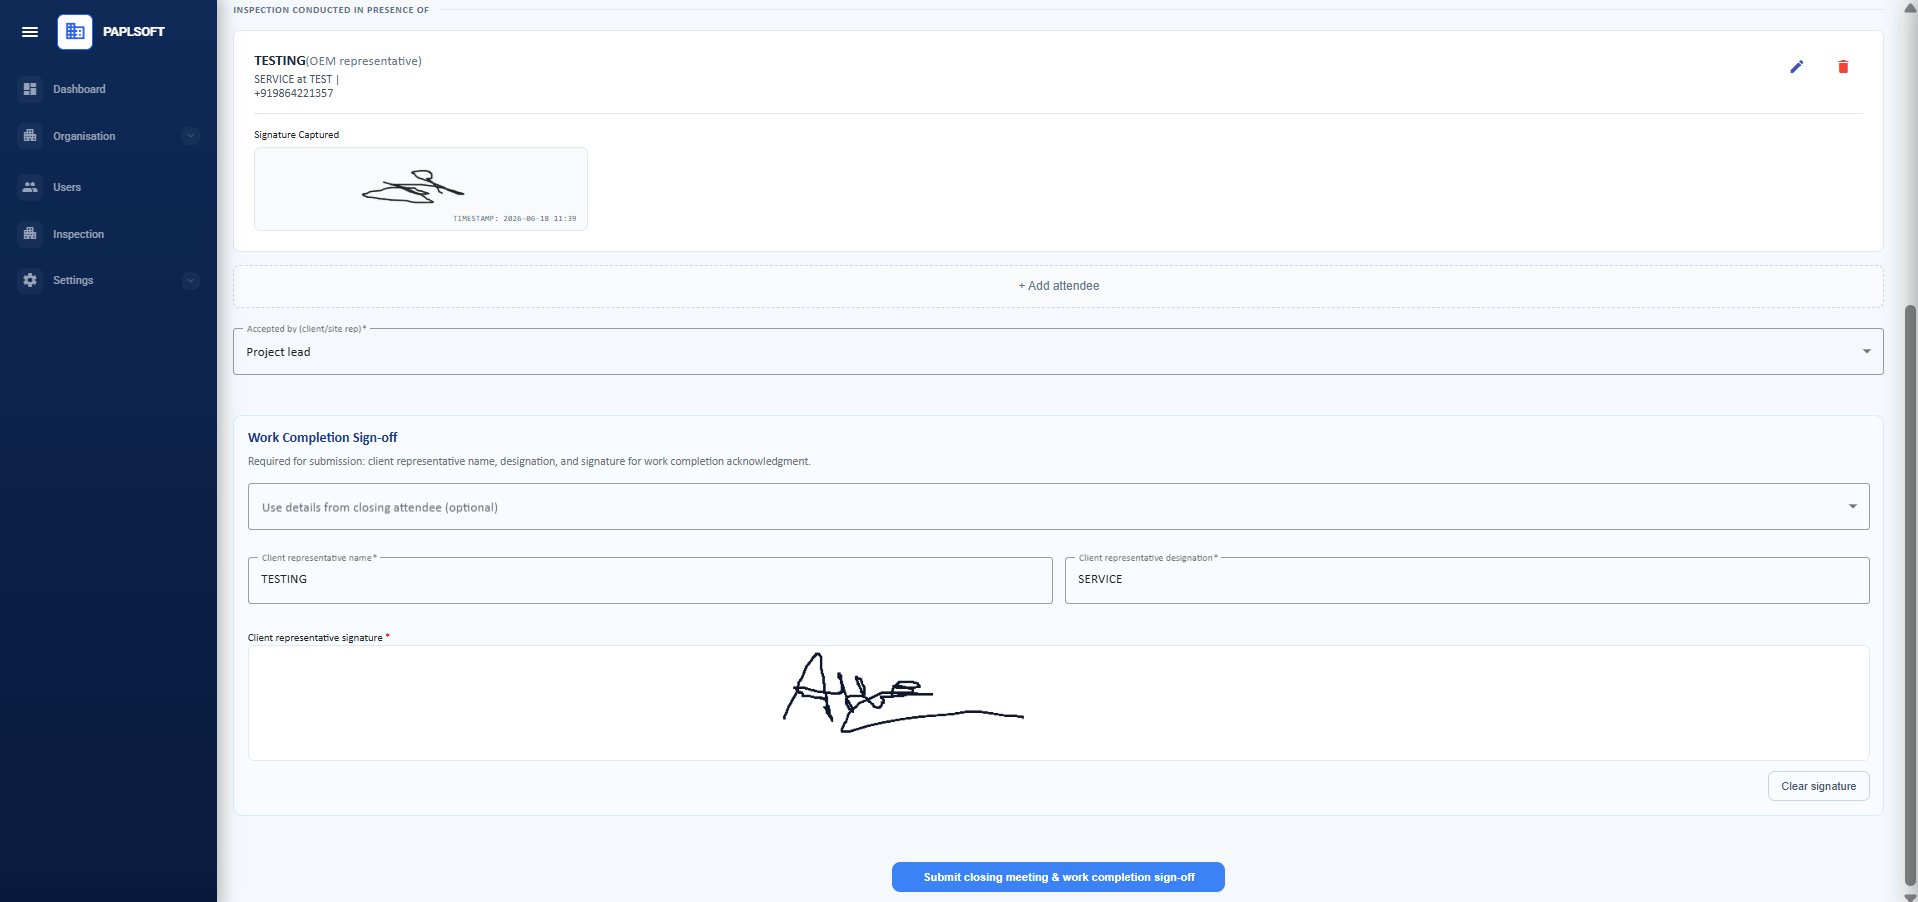
The "Accepted by (client/site rep)" dropdown and a hand-drawn client signature are both required. Once the signature is captured, click "Submit closing meeting & work completion sign-off" to proceed to Customer Feedback.
Stage 8 — Customer Feedback
The Customer Feedback stage collects the client's satisfaction ratings for the inspection. This is filled in together with the client representative on site before leaving.
18 Customer Feedback — satisfaction ratings form
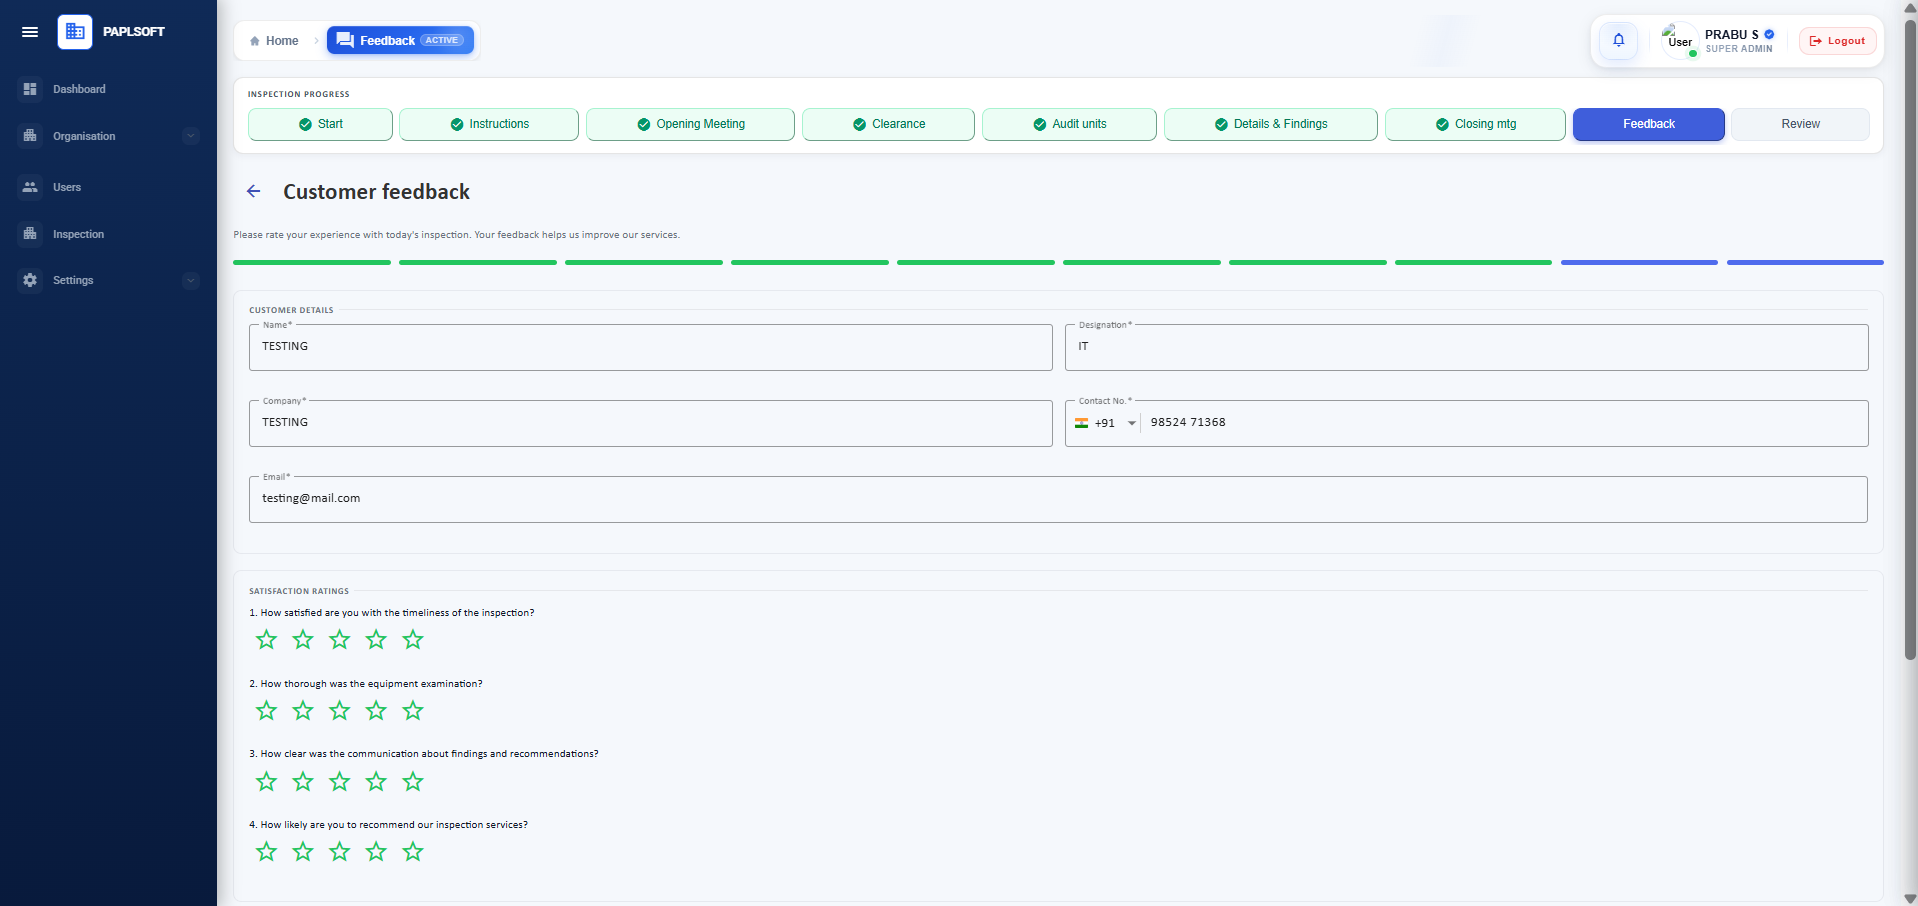
Four satisfaction questions are rated on a 5-star scale: timeliness, thoroughness of equipment examination, clarity of communication, and likelihood to recommend. Customer details (name, designation, company, email) are entered at the top.
Submitting a Star Rating
Click any star to set the rating. A Review dialog appears allowing the client to add a written comment for that rating before confirming.
19 Rating review dialog — customer adds written comment
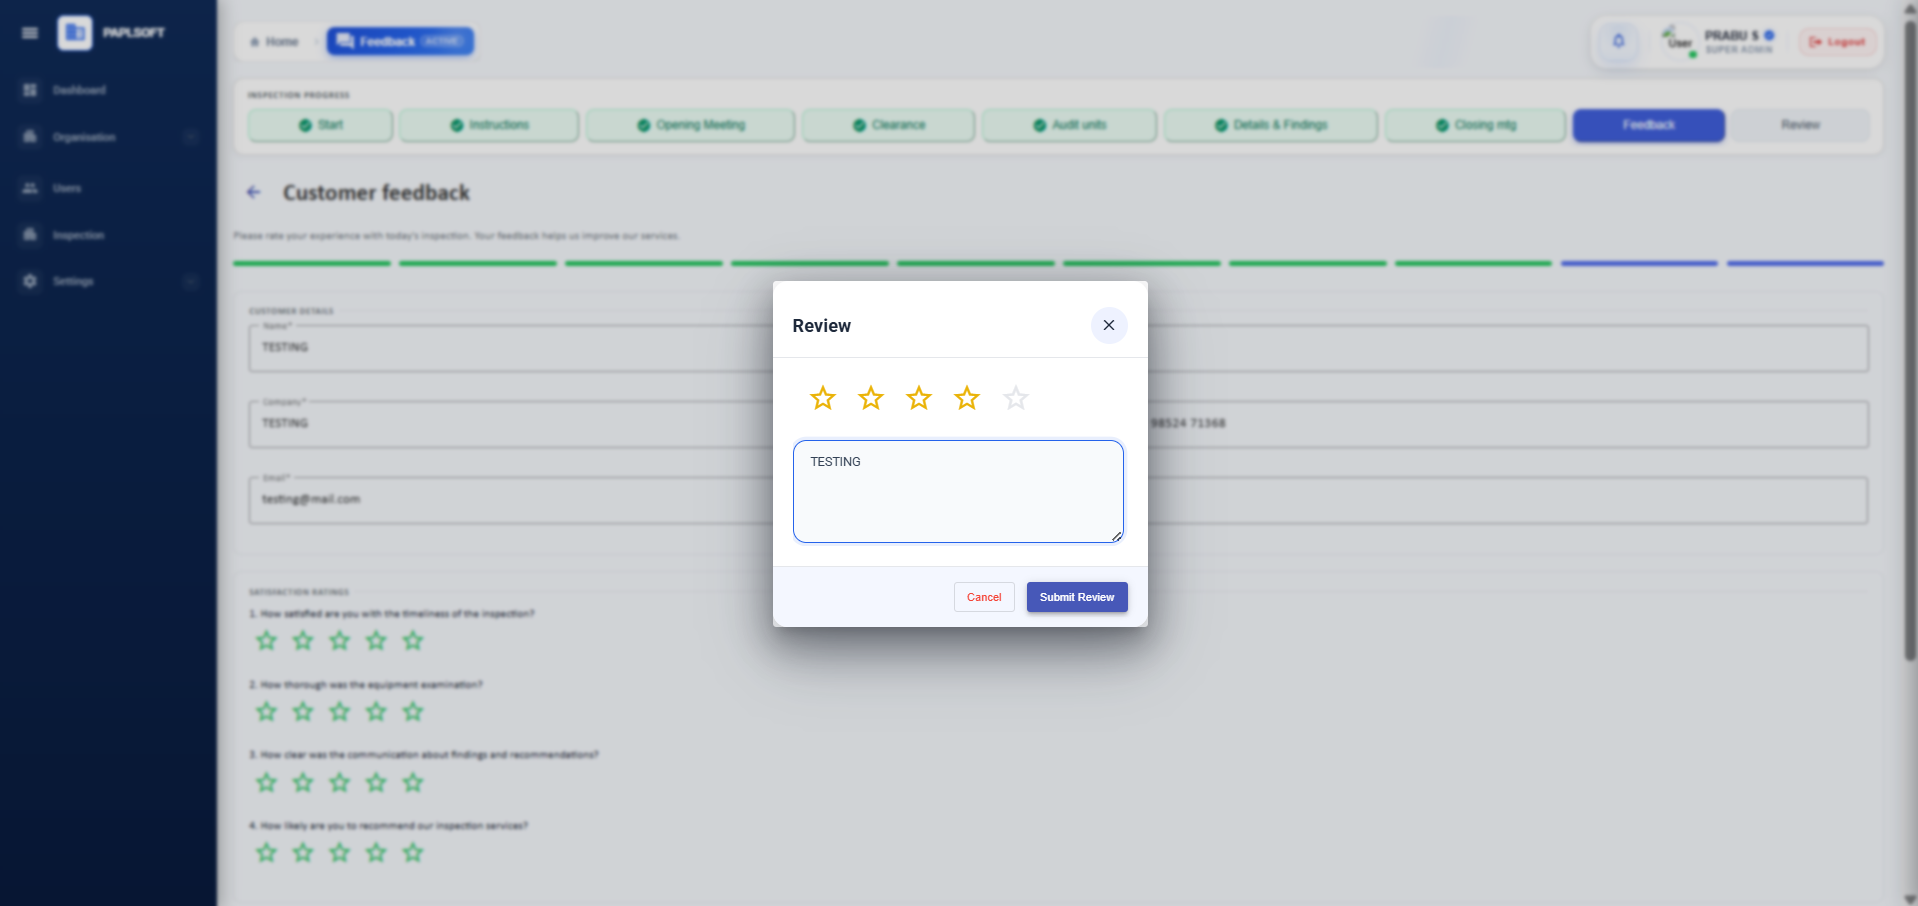
The client can select a star level and optionally type a comment. Click "Submit Review" to confirm that rating and close the dialog. Repeat for each of the four questions.
20 All ratings submitted — ready for customer signature
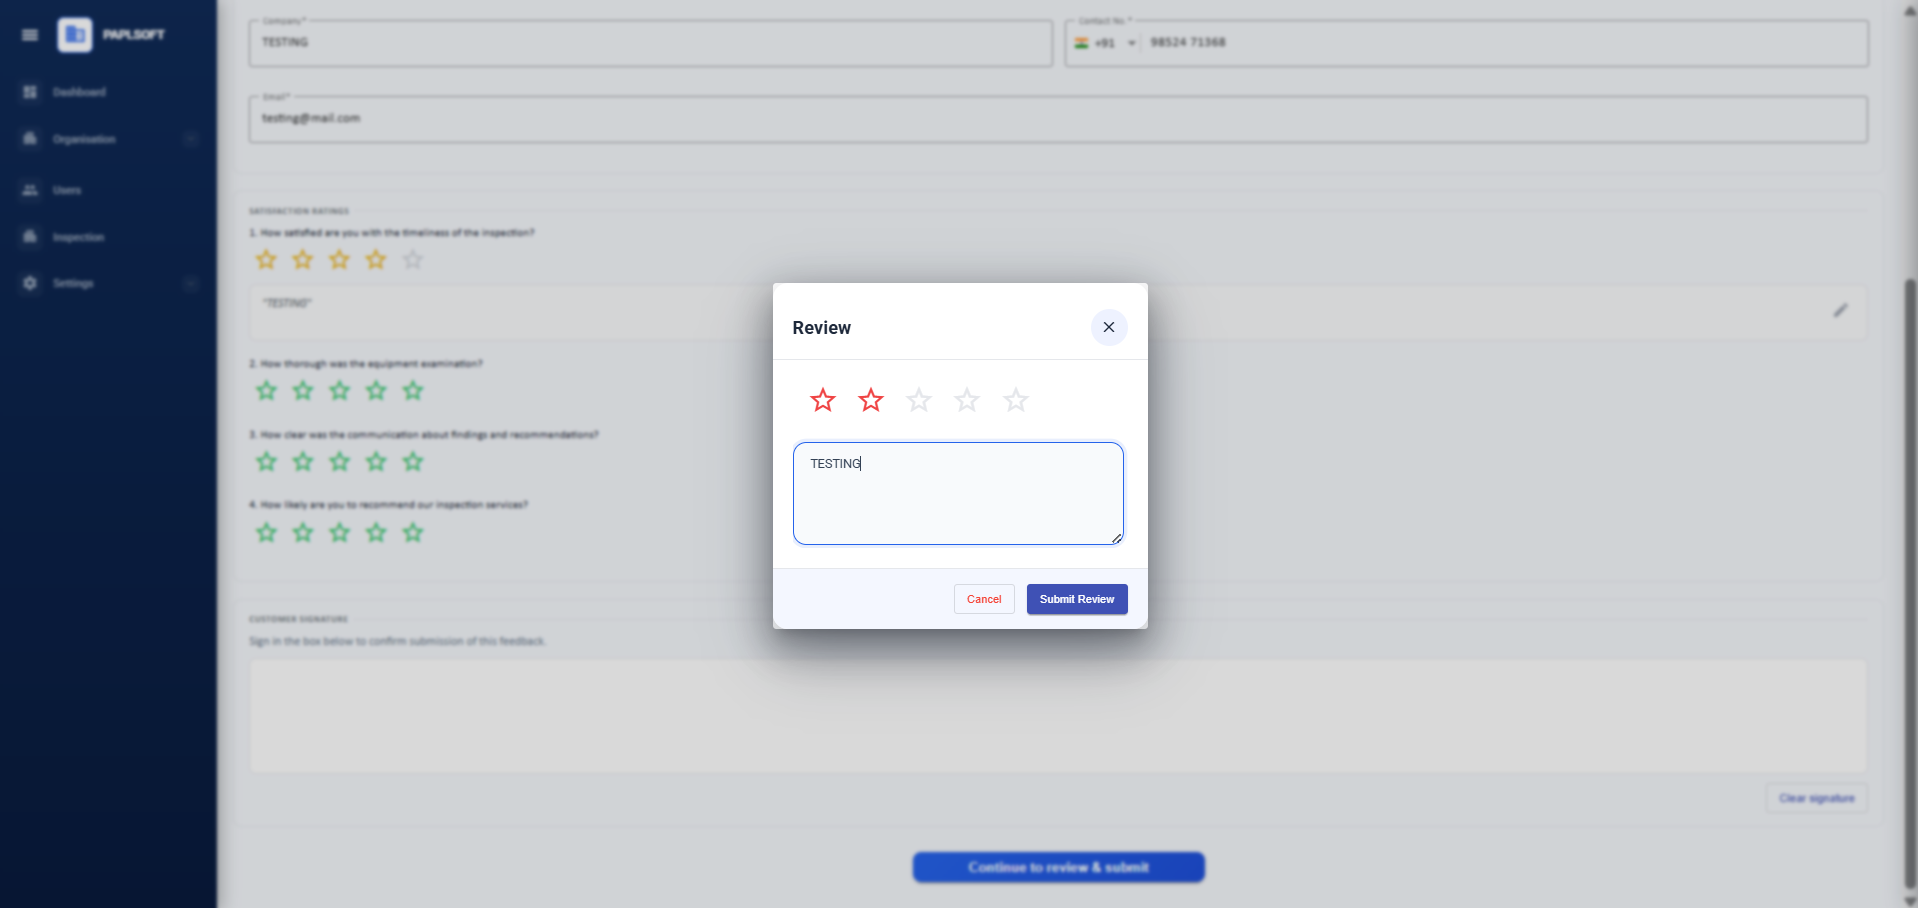
Completed ratings show the selected stars and any comments below each question. Scroll down to the Customer Signature section to finalise.
Customer Signature
The customer signs in the signature box at the bottom of the feedback page to confirm their ratings. Once signed, click Continue to review & submit.
21 Customer signature — final confirmation of feedback
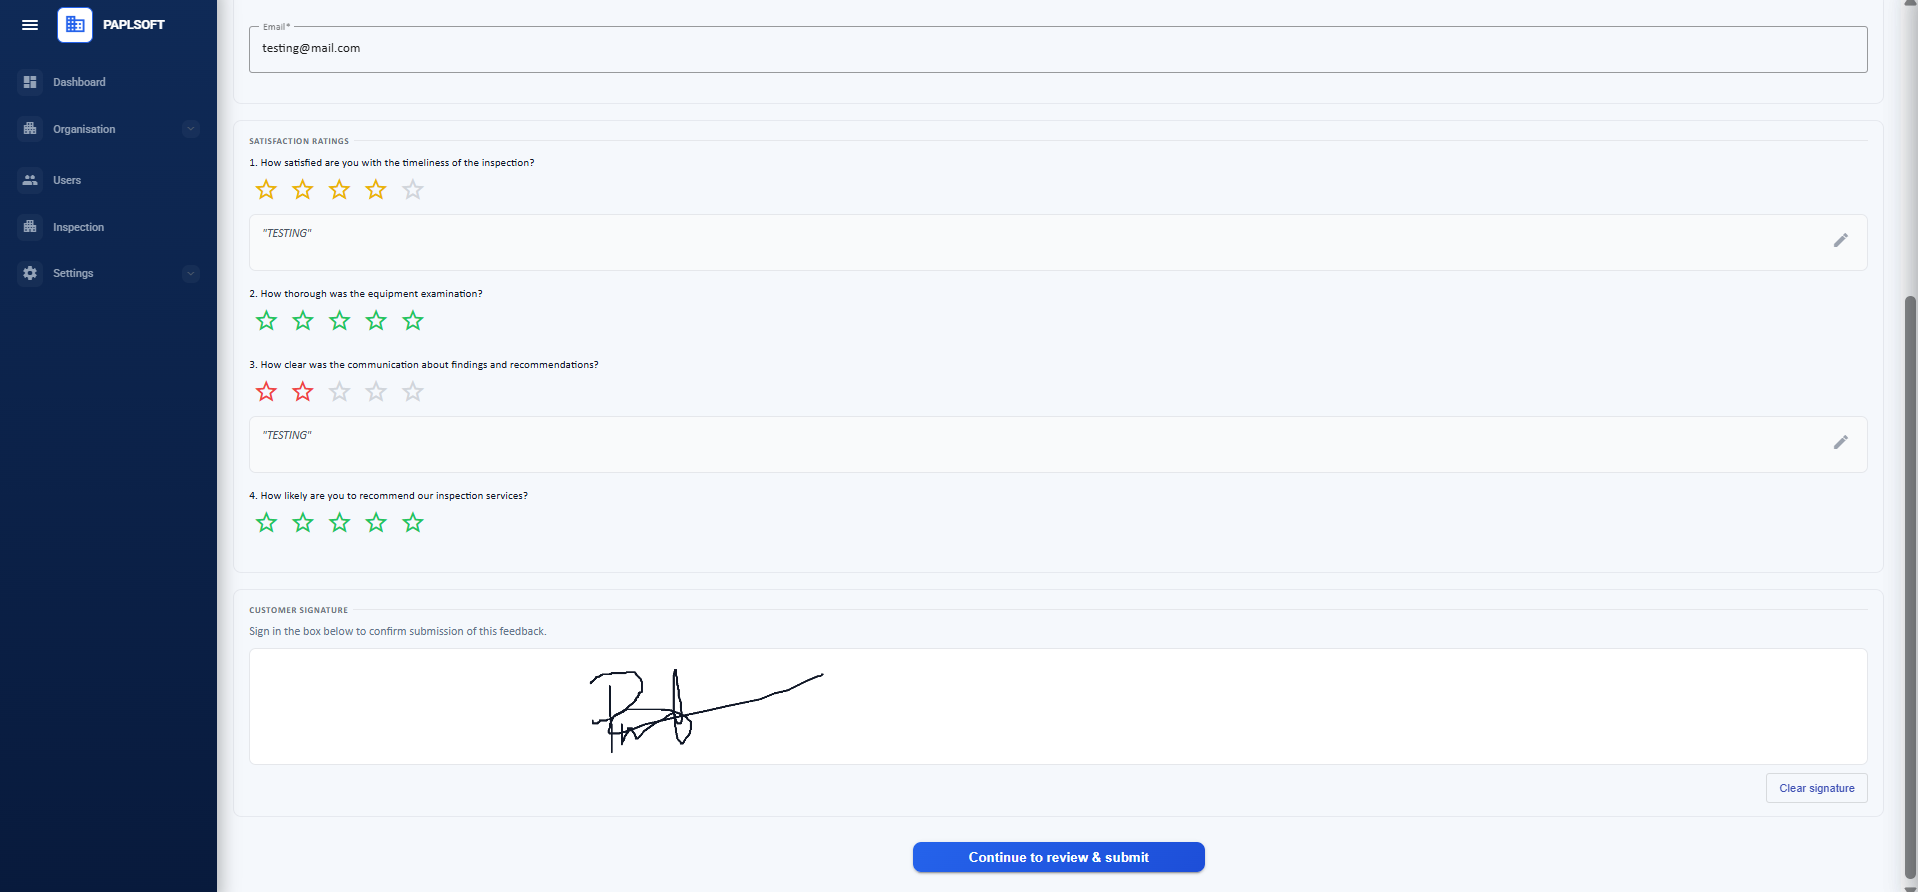
The customer draws their signature in the box. Click "Clear signature" to redo if needed. Once the signature is captured the "Continue to review & submit" button activates.
Stage 9 — Review & Submit
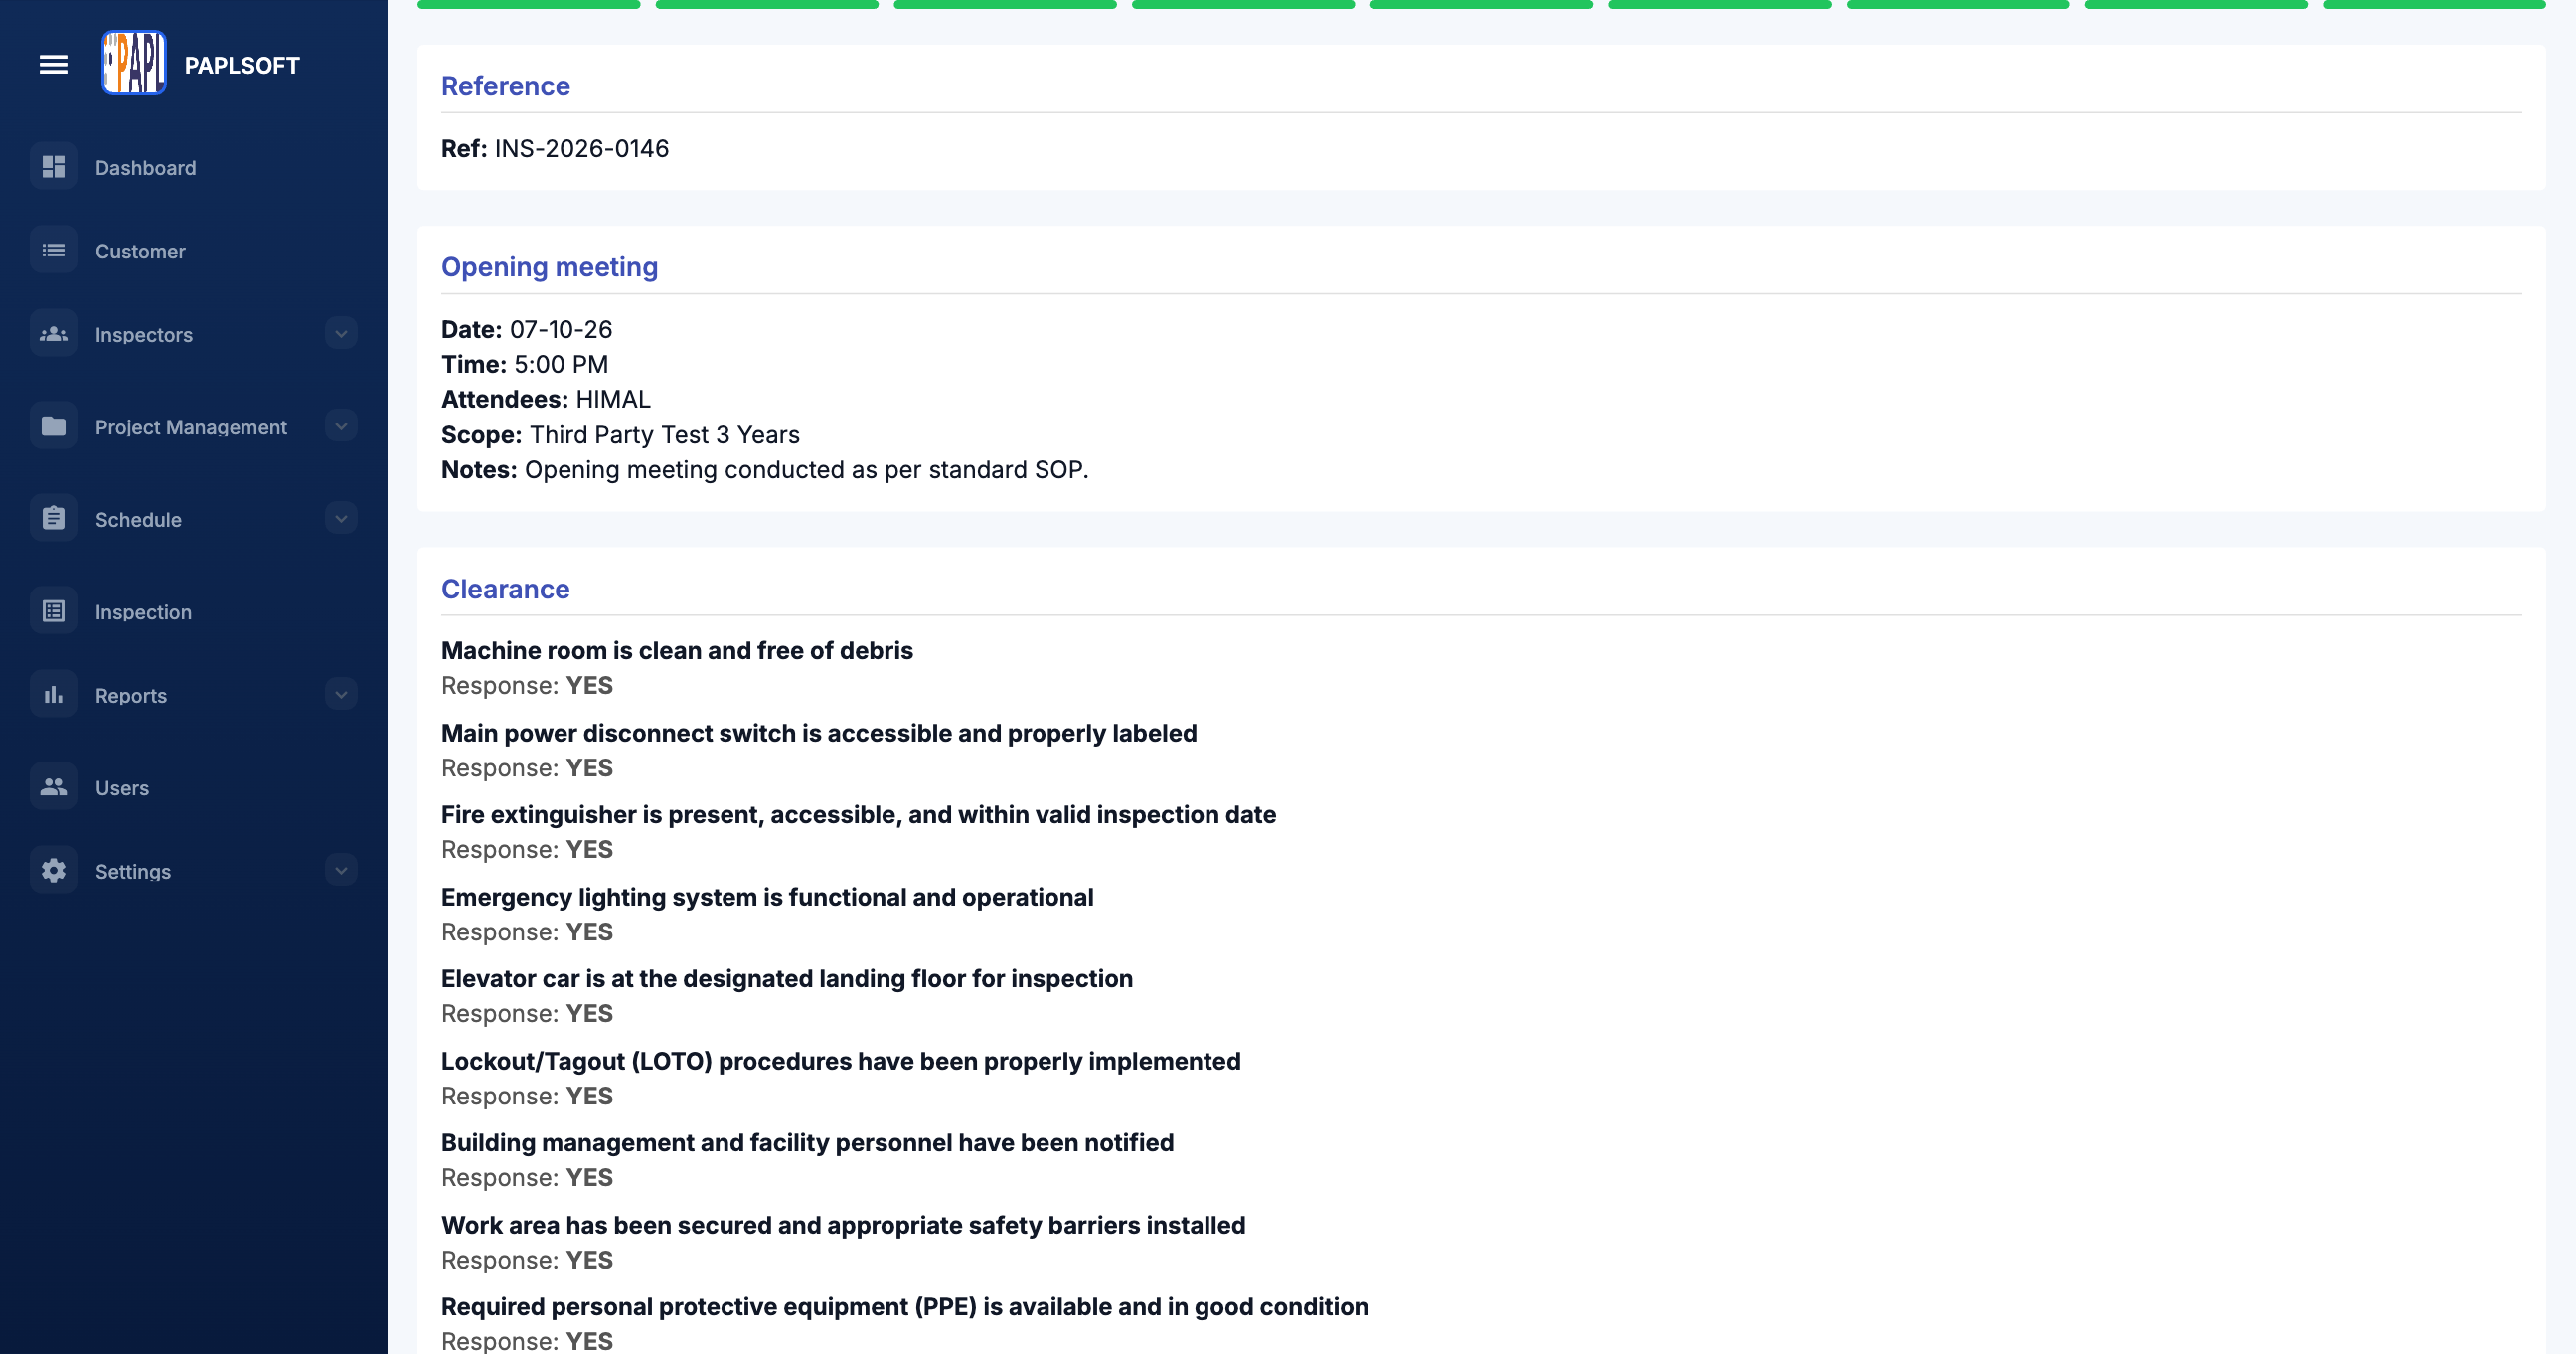
The Review & submit page presents a full summary of every completed stage — Opening Meeting, Clearance, Audit units, Findings, Closing Meeting, and Feedback. The system validates that all required sections are present before allowing final submission. Scroll through and verify the details are accurate.
22 Review & submit — full stage summary
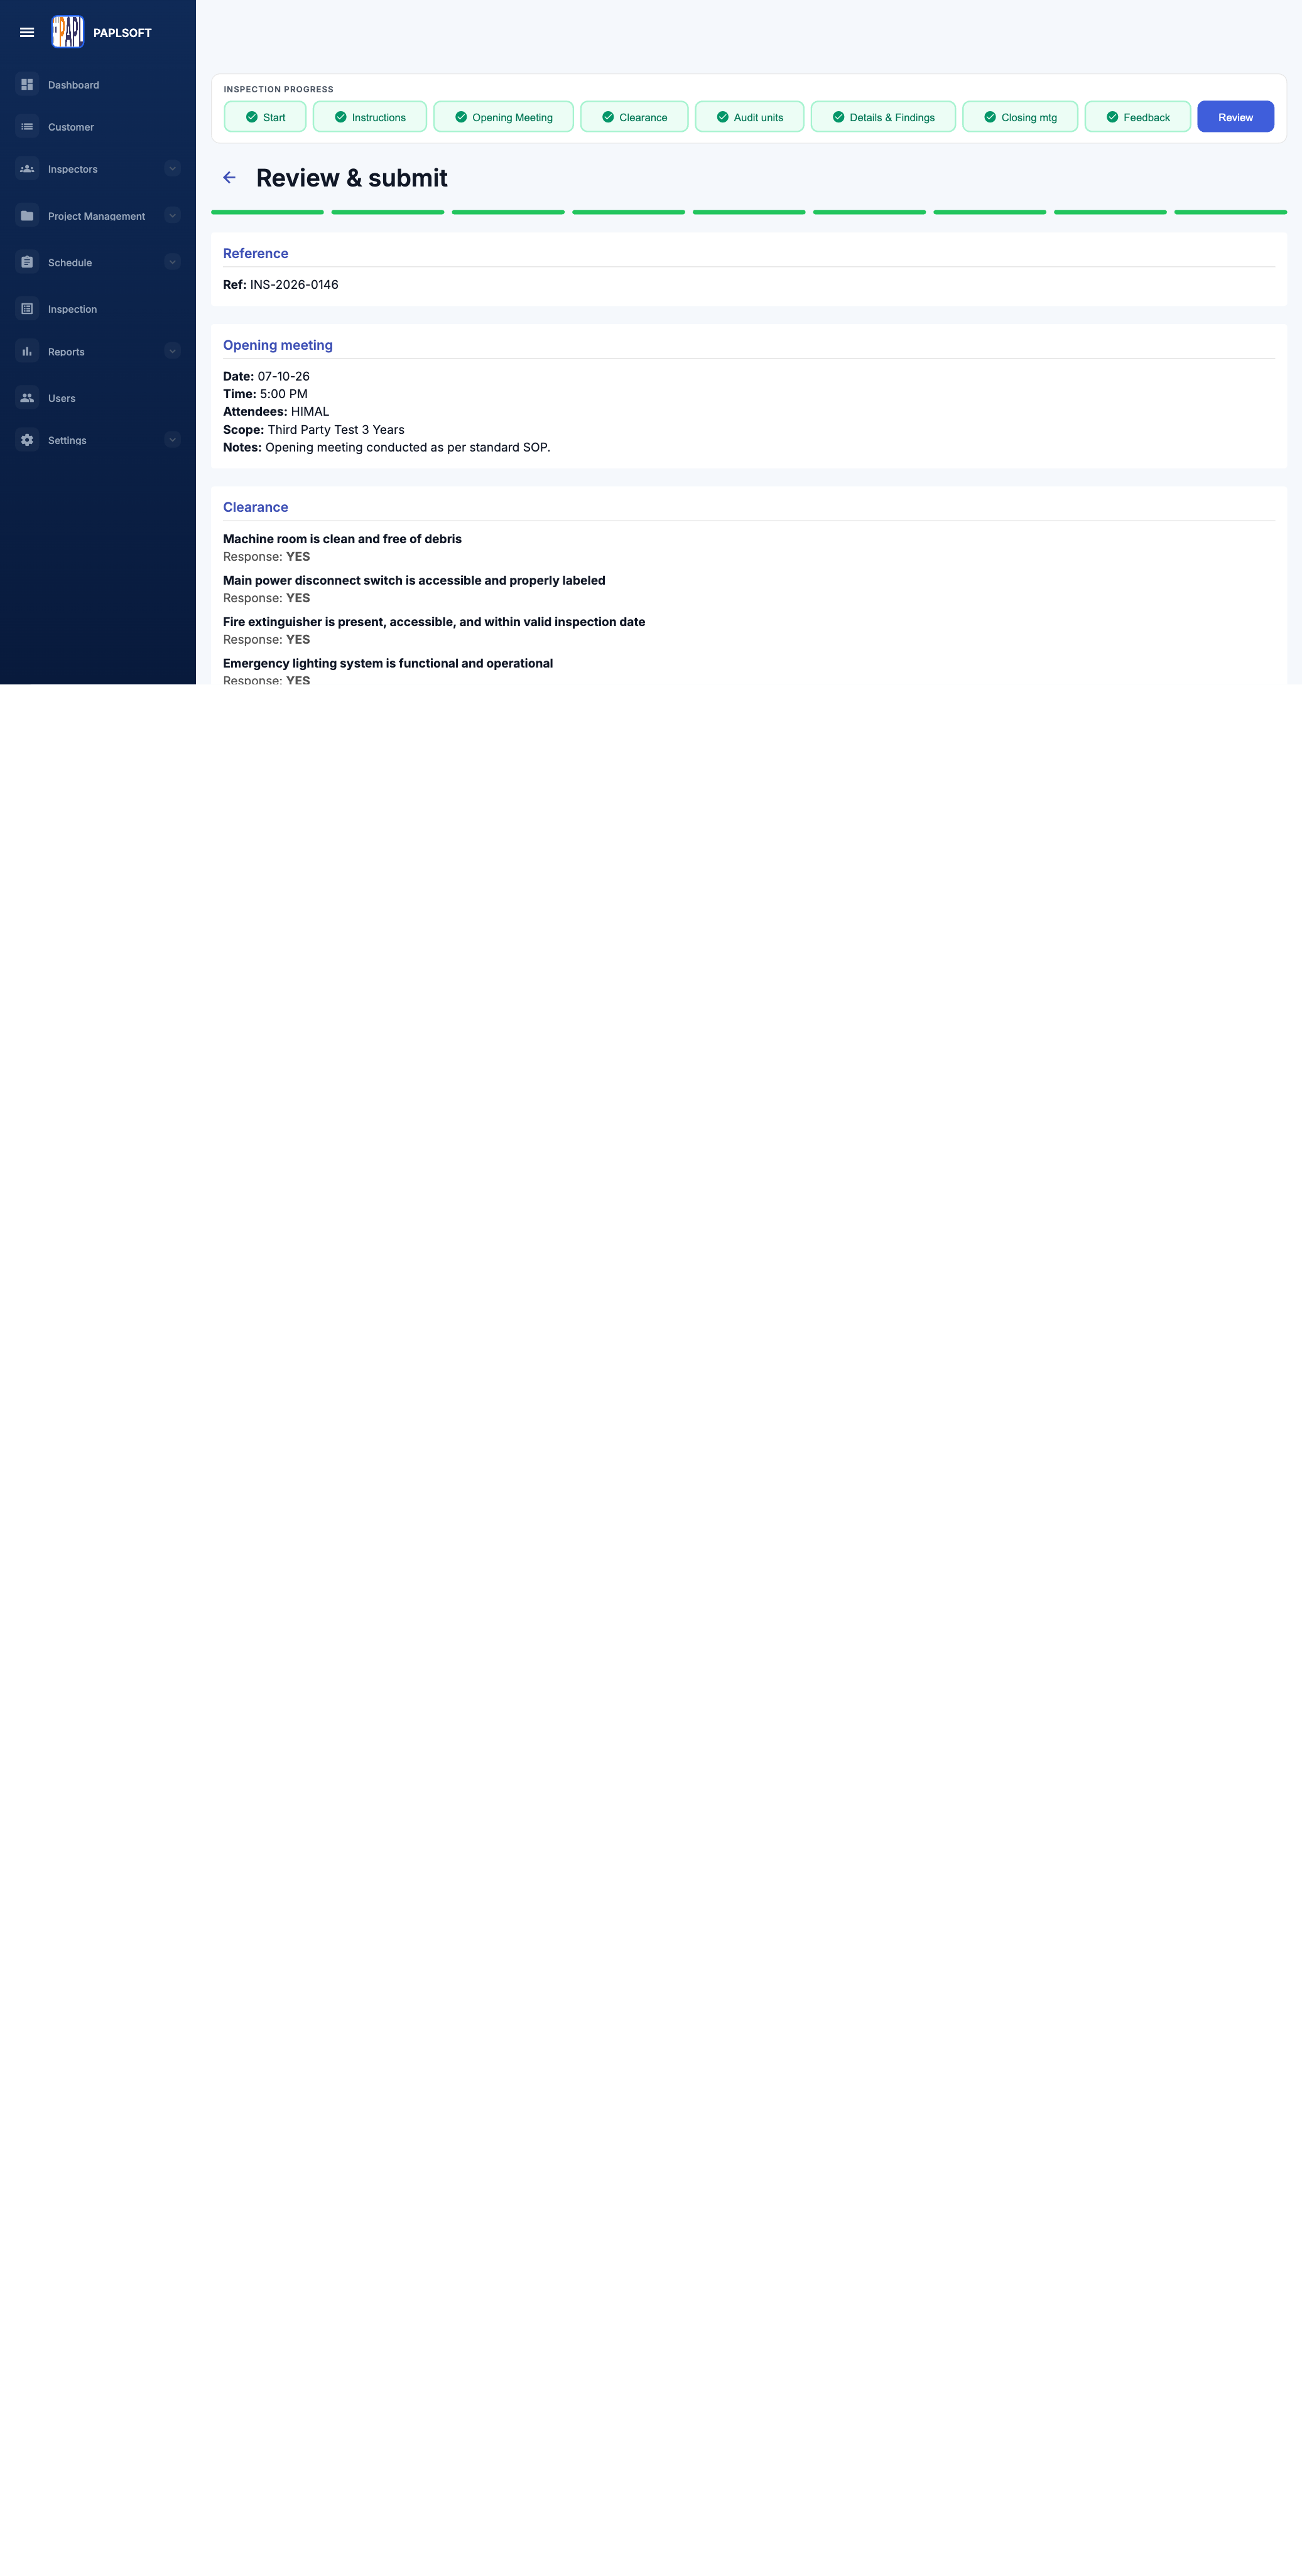
All nine stages show green checkmarks in the INSPECTION PROGRESS bar. The page lists a summary of every stage — Reference, Opening Meeting details, Clearance responses, Findings, Closing Meeting, and Feedback ratings.
Certificates & Documents
Below the inspection summary, the following documents are generated automatically:
23 Certificates of Inspection and Key Abstract of Observations
Certificates of inspection — shows each unit eligible for a certificate. Click Generate certificate to create the official certificate PDF. Key Abstract of Observations — a summary PDF of all key findings. Click View key abstract to open it or Regenerate to refresh.
24 Work Completion Certificate, confirmation checkbox, and Accept & submit button
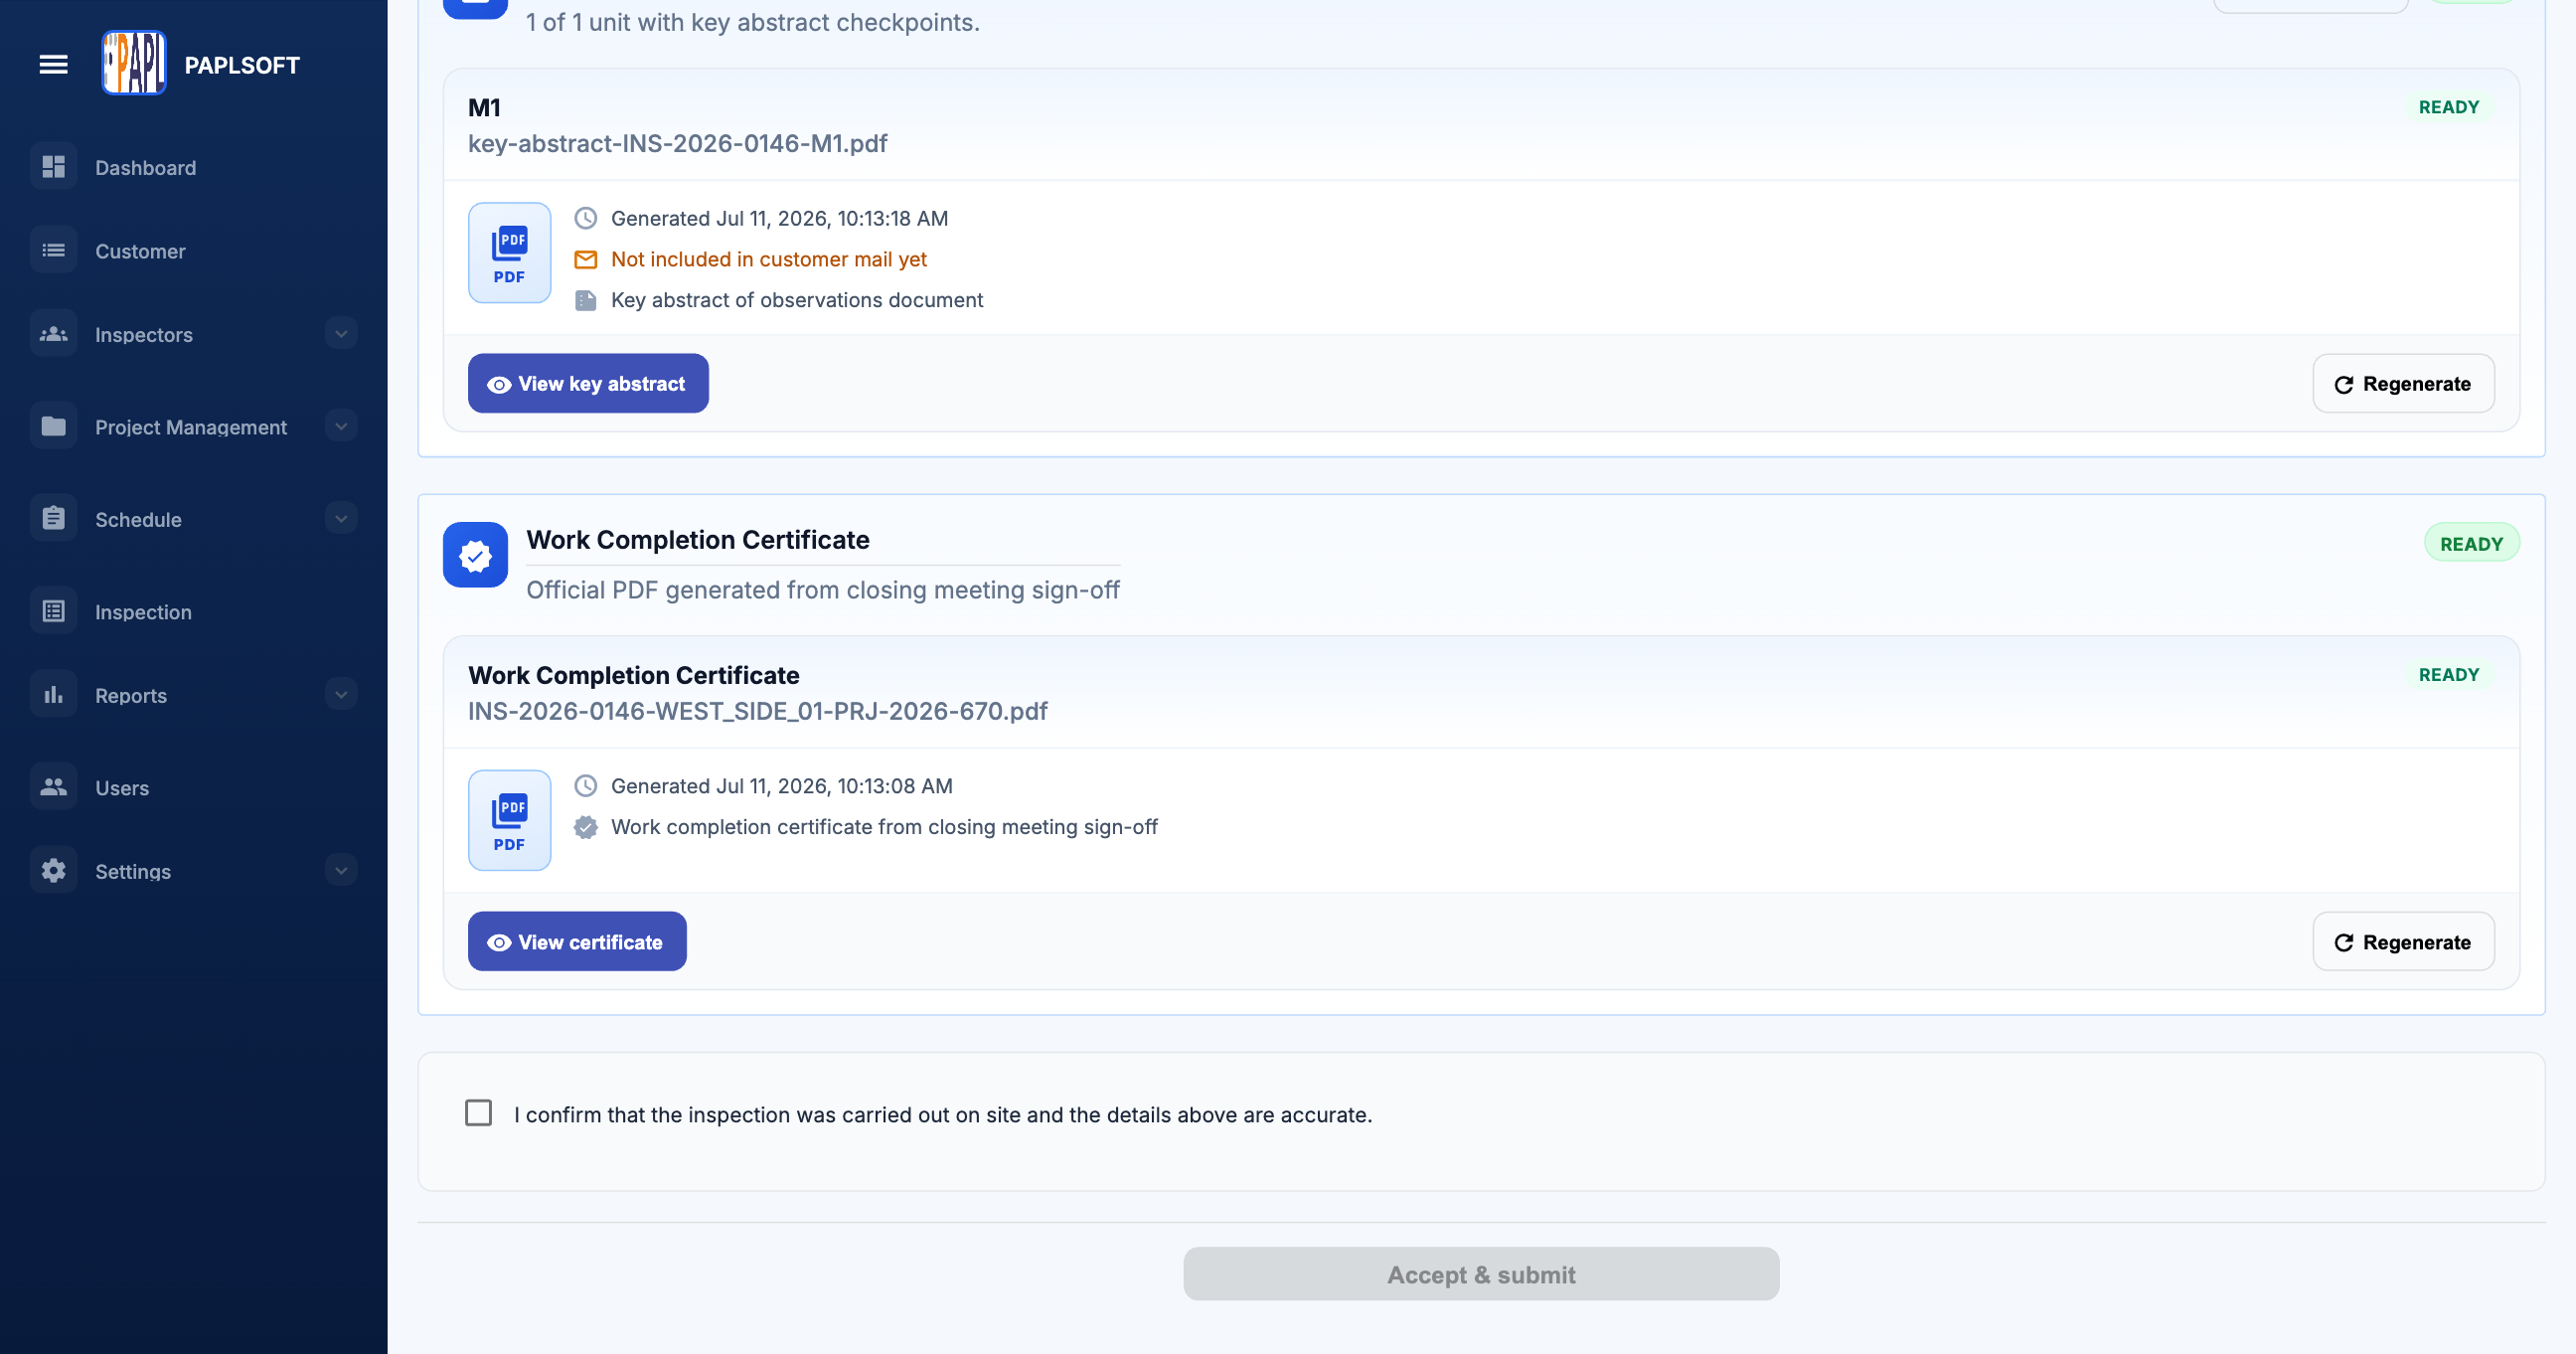
Work Completion Certificate — generated from the closing meeting sign-off. Click View certificate to open the PDF. Tick the confirmation checkbox ("I confirm that the inspection was carried out on site and the details above are accurate.") to activate the Accept & submit button, then click it to finalise.
Once submitted, the status changes to Submitted and the report enters the administrator's review queue.
💡
After submission, track your report status from the
Inspection Queue. It will show Submitted → Approved or Returned, as the administrator acts on it.